HP 3PAR T-Class Installation and Deinstallation Guide Abstract This guide describes installation and deinstallation procedures for the HP 3PAR T-Class Storage System. The installation of HP 3PAR equipment is to be performed by qualified technicians who are authorized by HP to install storage systems and their hardware components. Authorized technicians include HP service engineers, Value Added Resellers (VARs), certified self-maintaining customers, and authorized third-party field technicians.
© Copyright 2014 Hewlett-Packard Development Company, L.P. The information contained herein is subject to change without notice. The only warranties for HP products and services are set forth in the express warranty statements accompanying such products and services. Nothing herein should be construed as constituting an additional warranty. HP shall not be liable for technical or editorial errors or omissions contained herein.
Contents I Preinstallation..............................................................................................8 1 Preparing for Storage System Installation....................................................9 Advisories...........................................................................................................................9 Preinstallation Planning.........................................................................................................9 Configuration Planning.....
Unpacking and Inserting the Drive Magazines.......................................................................58 Unpacking Drive Magazines..........................................................................................58 Drive Magazine Loading Pattern.....................................................................................59 Inserting the Drive Magazines.........................................................................................61 Installing Drive Cage Filler Panels...
Mixed Connectivity Setup........................................................................................126 Modem Setup........................................................................................................132 Secure Site Setup...................................................................................................139 Installing HP 3PAR OS Files..........................................................................................
Bulgarian recycling notice............................................................................................181 Czech recycling notice.................................................................................................181 Danish recycling notice................................................................................................181 Dutch recycling notice..................................................................................................
G Storage System Sparing Schedule........................................................214 ...............................................................................................................215 Index.......................................................................................................
Part I Preinstallation
1 Preparing for Storage System Installation This chapter provides information about meeting system requirements, planning the configuration and preparing an operating site for the HP 3PAR Storage Systems. NOTE: For additional information about preinstallation planning and system requirements, refer to the HP 3PAR S-Class/T-Class Storage System Physical Planning Manual and the systems planning document described in the “Preinstallation Planning” (page 9) section of this chapter.
Configuration Planning In addition to verifying the operating site meets all physical and environmental requirements, the preinstallation process also includes configuration planning. • Hardware configuration planning issues such as system component layout and drive magazine allocation are discussed in this chapter and in the HP 3PAR S-Class/T-Class Storage System Physical Planning Manual.
Figure 1 Storage System and Service Processor on the Customer Network (Shared Topology) A shared topology requires: • A static IP address and system name for the storage system. • Two Ethernet connections from a switch or hub to the storage system controller nodes. • A static IP address for the service processor. • One Ethernet connection from a switch or hub to the service processor. • At least one management station on the network segment.
Split With a split network topology, the storage system is on the internal customer network, but the storage system communicates with the service processor on a dedicated private network segment (Figure 3 (page 12)). 3PAR assigns the IP address to the private segment. Figure 3 Storage System on the Local Area Network with the Service Processor on a Private Segment (Split Topology) A split topology requires: • Two static IP addresses and a system name for the storage system.
processor and HP Central or a local service provider can be made using the customer network and the Internet, or through a point-to-point connection using a modem. Connections using the customer network pass through the customer firewall. Connections using a modem, bypass the customer firewall.
Providing for Service Access HP 3PAR Storage System cabinets feature locking rear doors, removable side panels and fascias to improve access for installing, cabling, and servicing components. See Table 2 (page 14) for storage system cabinet dimensions. Table 2 Storage System Cabinet Dimensions Cabinet Height Depth Width 2M (40U) 76.4 in (194 cm) 23.8 in (60.5 cm) 36 in (91.
Table 5 Raised Floor Specifications Specification Value Flatness tolerance Per 10 ft (3 m) span Overall Less than 0.06 in. (1.5 mm) Less than 0 .10 in. (2.5 mm) Deflection Dynamic Permanent Less than 0.15 in. (3.8 mm) Less than 0.02 in. (0.5 mm) Pedestal assembly load Axial Side At least 5,000 lb (2,268 kg) At least 30 ft-lb (40.7 N-m) Placing each cabinet across two floor tiles is strongly recommended.
Tile Cutout Specifications Figure 6 (page 16) contains the recommended tile cutout specifications for storage system cabinets. WARNING! To prevent potential collapse, loaded floor panels that have cutouts to facilitate cable routing may require additional reinforcement. Figure 6 Tile Cutout Specifications for a Storage System Cabinet Resting on Two Floor Tiles Meeting Electrical Requirements Before placing a storage system, verify the operating site has the necessary electrical circuitry.
HP 3PAR cabinets contain four power distribution units (PDU). Each PDU requires service from a dedicated single-phase 200-240 VAC 30-A grounded electrical circuit. HP recommends a redundant AC configuration using independent sources to provide a dedicated, grounded electrical circuit to each PDU.
Figure 8 Rear View of the Power Domains Within the Controller Nodes and Drive Chassis WARNING! To avoid possible injury, damage to storage system equipment, and potential loss of data, do not use the surplus power outlets in the storage system PDUs. Never use outlets in the PDUs to power components that do not belong to the storage system or to power storage system components residing in other cabinets. To support redundant power: • The power supplies in each power domain must connect to separate PDUs.
Figure 9 Redundant Power Configuration Diagram (T400 Node Cabinet or Drive Expansion Cabinet) Table 6 T400 Redundant Power Configuration (T400 Node Cabinet or Drive Expansion Cabinet) PDU Number Power Bank AC Cord 0 1 0-L, 1-L 0 2 2-R, 3-R 1 1 2-L, 3-L 1 2 0-R, 1-R 2 1 4-R, 5-R Supporting Redundant Power 19
Table 6 T400 Redundant Power Configuration (T400 Node Cabinet or Drive Expansion Cabinet) (continued) PDU Number Power Bank AC Cord 2 2 6-L, 7-L 3 1 6-R, 7-R 3 2 4-L, 5-L Figure 10 (page 21) and Table 7 (page 21) contain information about power cord connections for T800 storage systems with PDUs placed back-to-back to take up only 2U of cabinet space rather than the standard 4U of space.
Figure 10 Redundant Power Configuration Diagram (T800 Node Cabinet) Table 7 T800 Redundant Power Configuration (T800 Node Cabinet) PDU Number Power Bank AC Cord 0 1 0-L, 1-L 0 2 2-R, 3-R 1 1 2-L,3 -L Supporting Redundant Power 21
Table 7 T800 Redundant Power Configuration (T800 Node Cabinet) (continued) 22 PDU Number Power Bank AC Cord 1 2 0-R, 1-R 2 1 5-R, 6-R 2 2 7-L, 8-L 3 1 7-R, 8-R 3 2 5-L, 6-L Preparing for Storage System Installation
2 Storage System Physical Layout and Numbering This chapter identifies the major components of the HP 3PAR T-Class Storage System and explains the numbering of the system components. NOTE: Illustrations in this chapter show sample systems and may not match a particular storage system configuration. Identifying Storage System Components Figure 11 (page 24) and Figure 12 (page 25) identify the major components of an T400 Storage System in a 2M (40U) 3PAR cabinet.
Figure 11 The Front of a T400 Storage System 24 Storage System Physical Layout and Numbering
Figure 12 The Rear View of a T400 Storage System Service Processor Placement A service processor designed to support all actions required for the maintenance of the storage system also resides at the bottom of the cabinet to provide real time, automated monitoring. The service processor allows HP to diagnose and resolve potential problems remotely. The service processor is usually installed directly above the PDUs and below the battery tray (Figure 13 (page 26)).
Figure 13 Placement of the Service Processor (T400) NOTE: For T800 Storage Systems, the service processor is located above the system backplane, below the lowest drive chassis but above the upper battery tray. Figure 15 (page 28) illustrates service processor placement for a T800. When a cabinet does not include a service processor, a filler panel covers the area of the cabinet that the service processor normally occupies.
Figure 14 Numbering of Chassis Bays in the Cabinet2 A storage system can be housed in a single cabinet or multiple cabinets. When multiple cabinets are required, the first cabinet (the controller node cabinet) holds the system backplane populated with controller nodes. Any additional cabinets, or drive chassis cabinets, hold the additional drive chassis that do not fit into the controller node cabinet.
Figure 15 Controller Node Cabinet Component Layout by Storage System Model3 3 3. When a 1U service processor is present, a 1U filler panel resides immediately above or below the unit.
Figure 16 Drive Chassis Cabinet Component Layout PDU Numbering For each cabinet, the four Power Distribution Units (PDU) occupy the lowest chassis bay in the cabinet. Numbers for PDUs are assigned: • Beginning with 0 • From top to bottom Figure 17 (page 30) illustrates the four PDUs at the bottom of a cabinet.
Figure 17 Numbering of PDUs NOTE: For T800 systems, the PDUs are positioned back-to-back to only occupy two units of space at the bottom of the cabinet instead of the standard four units of space. PDUs are accessible from both the front and the rear of the system. “Controller Node Cabinet Component Layout by Storage System Model3” (page 28) illustrates PDU placement for a T800 system.
Figure 19 Battery Backup Unit BBU placement and numbering schemes vary according to the type of components used in the system. A battery tray may hold a maximum of four BBUs. The number of BBUs and battery trays in a system depends on the number of controller nodes installed (Table 9 (page 31)).
Figure 20 Battery Backup Units Have Batteries Resting Vertically When facing the rear of the storage system, the BBUs are numbered from right to left, 0 through 3. When two battery trays are present, the upper tray is numbered 0 and the lower tray is numbered 1 (Figure 21 (page 32)). Figure 21 BBU Numbering Scheme Controller Node Numbering A T-Class Storage System may contain two, four, six, or eight controller nodes per system.
Figure 22 Numbering of Controller Nodes in an T800 Backplane As shown in Figure 23 (page 34), a controller node contains six PCI slots. These slots accept PCI adapters such as quad-port Fibre Channel adapters, iSCSI adapters, and Ethernet adapters. The controller node also has a management Ethernet port (E0), a dedicated Remote Copy over IP (E1), and a maintenance port (C0).
Figure 23 Numbering for Fibre Channel Adapters in the Controller Node PCI Slots Each Fibre Channel adapter in a PCI slot has four ports. Each iSCSI adapter in a PCI slot has two ports. PCI adapters assume the numbers of the occupying PCI slots. • In dual-port adapters, ports are labeled port 1 and port 2 from top to bottom. • In quad-port Fibre Channel adapters, the ports are numbered port 1, port 2, port 3 and port 4 from top to bottom.
Figure 24 Control Cache and Data Cache DIMMs in the Controller Node Numbers for controller nodes and their components are assigned in the order indicated in Table 10 (page 35). Table 10 Numbering System for Controller Nodes and Their Components The Following Components... Are Numbered... Running from...
Numbers for drive chassis are assigned: • Beginning with 0. • From bottom to top, beginning with the drive chassis directly above the storage system backplane. Drive chassis are always placed above the storage system backplane enclosure and numbered according to their position in relation to the backplane, as shown in Figure 25 (page 36).
Figure 26 Numbering of Drive Chassis Components Figure 27 Numbering of Disks on a DC4 and DC4 Type-2 Drive Magazine Numbers for drive chassis components are assigned: • From bottom to top. • From rear to front (in reference of disks). • In the order indicated by “Numbering System for Drive Chassis Components” (page 37). Table 11 Numbering System for Drive Chassis Components The Following Components... Are Numbered... Running from... Drive cages 0,1,...
Table 11 Numbering System for Drive Chassis Components (continued) The Following Components... Are Numbered... Running from...
Figure 28 Pattern for Loading Initial Drive Magazines Into the Drive Chassis NOTE: See “Installing the Drive Magazines” (page 56), for further instructions on drive magazine allocation. Power Supply Numbering The cabinets are divided into upper and lower power domains containing drive cages or controller nodes and dedicated power supplies. The drive cages and controller nodes depend on these power supplies connecting to PDUs for power.
Figure 29 Numbering of Power Supplies Within the Power Domains 40 Storage System Physical Layout and Numbering
Part II Installation
3 Setting Up the Storage System This chapter provides instructions for unpacking and placing HP 3PAR cabinets. It also includes instructions for removing the rear door, removing side panels, and adjusting the power cabling configuration. CAUTION: Before unpacking and placing a cabinet, establish an operating site to meet the physical, electrical, and atmospheric requirements for a storage system.
1. Locate the front of the shipping container (“The Front of the Cabinet Shipping Container ” (page 43)) and unlatch the four rotary latches securing the front panel. Figure 30 The Front of the Cabinet Shipping Container 2. To unlatch the rotary latches, raise the levers and turn them counterclockwise one half turn, as shown in “Unlatching a Rotary Latch” (page 164).
Figure 31 Unlatching a Rotary Latch 3. 4. Lower the front panel of the shipping container to form a ramp. Remove the packing foam from the front of the storage system (“Removing Packing Foam ” (page 44)). Figure 32 Removing Packing Foam 5. 44 Grasp the two straps on either side of the cabinet and carefully pull the cabinet out of the container (“Location of Straps ” (page 45)).
Figure 33 Location of Straps 6. 7. Carefully guide the cabinet down the ramp. Remove the plastic ESD-preventative packing materials from the cabinet and place into the shipping container for reuse. NOTE: Retain packing materials, including wooden crates and pallets, for reuse. Placing the Storage System After following the guidelines to establish a safe operating site as described in Chapter 1 (page 9), place the storage system in the operating location.
1. Use an adjustable wrench and turn clockwise to lower each foot until the weight of the cabinet rests on the leveling feet instead of the casters (“Lowering a Leveling Foot” (page 46)). Figure 34 Lowering a Leveling Foot 2. Lock the feet in place by turning the locking nut on each foot counterclockwise until tight with an adjustable wrench (“Tightening the Locking Nut” (page 46)). Figure 35 Tightening the Locking Nut 3. Verify the cabinet is stationary.
1. 2. Use a #2 Phillips screwdriver to loosen the three screws securing the fascia. Pull the fascia to remove from cabinet. Figure 36 Removing a Front Fascia Removing Locking Fascias HP 3PAR cabinets features optional locking left and right fascias. HP recommends locking both fascias during operation. The locking fascias prevent the bezels from being removed and restrict access to the drive chassis and drive magazines.
1. Use the provided key to unlock the left and right fascia (“Location of Fascia Locks” (page 48)). Figure 37 Location of Fascia Locks 2. Use a #2 screwdriver to remove the three screws securing each fascia and carefully remove each fascia from the cabinet. Locating the Wrist Grounding Strap To prevent damage from electrostatic discharge, it is necessary to wear an Electrostatic Discharge (ESD) wrist grounding strap during installation and maintenance of the storage system.
Figure 38 Removing a Bezel from the Storage System Removing the Rear Door HP 3PAR cabinets feature a locking rear door. HP recommends locking the rear door during operation. At the time of delivery, the rear door is unlocked. The key is taped to the inside of the rear door. The rear door is also removable to improve access to the rear of the system during installation and maintenance. To remove the rear door: 1.
Figure 39 Lift-Off Hinges on the Door 3. 50 Release the bottom hinge by squeezing together the two release pins on the hinge and sliding the pins to the right (“Releasing the Hinge on the Rear Door of the Cabinet” (page 51)).
Figure 40 Releasing the Hinge on the Rear Door of the Cabinet 4. After releasing the bottom hinge, release the top hinge and pull the door away from the cabinet to remove it (“Removing the Rear Door” (page 51)). Figure 41 Removing the Rear Door Removing Side Panels In addition to removing the rear door, remove one or more side panels prior to continuing with the installation.
NOTE: It is necessary to remove the side panels of a T800 cabinet when routing the main power cords up through the top of the cabinet. • To remove a side panel, use a #2 Phillips screwdriver to loosen the screws securing the side panel.
There may be instances when an operating site lacks the capacity to provide each PDU in the system with a dedicated electrical circuit. HP recommends choosing an alternate operating site which meets all of the requirements detailed in Chapter 1 (page 9). The standard cabling configuration for storage systems in HP 3PAR cabinets supports redundant AC within the system through AC cords situated between the power domains of the system.
Figure 43 Redundant Power Cabling Diagram (T400 Node Cabinet or Drive Expansion Cabinet) 54 Setting Up the Storage System
Figure 44 Redundant Power Cabling Diagram (T800 Node Cabinet) Adjusting Power Cables 55
4 Installing the Drive Magazines This chapter describes how to install drive magazines after placing a system at the operating site. CAUTION: To avoid damaging the system equipment, do not relocate or move the storage system over uneven surfaces with the drive magazines installed. NOTE: If the cabinet has locking fascias, first remove the fascias to access the bezel. See “Storage System Fascias” (page 46).
Handling the Drive Magazines When handling the drive magazines, observe the following precautions: • Always use a wrist grounding strap. A wrist grounding strap is provided with the cabinet. Attach the grounding clip directly to an unpainted surface of the cabinet. • Always use both hands when carrying a drive magazine. • Avoid contact between drive magazines and clothing that can carry an electrostatic charge.
Figure 47 Numbering of Drive Chassis Components Figure 48 Numbering of Disks on the Drive Magazines Unpacking and Inserting the Drive Magazines The following sections describe how to unpack and install drive magazines into the storage systems. Unpacking Drive Magazines The drive magazines arrive in a shipping container. Containers hold a maximum of 30 magazines. Magazines are packaged in protective material to prevent damage from electrostatic discharge. To unpack the drive magazines: 1.
3. To unlatch a rotary latch, raise the lever and turn it counterclockwise, as shown in “Unlatching a Rotary Latch” (page 59). Figure 49 Unlatching a Rotary Latch 4. 5. Identify the drive magazine sizes. See the HP 3PAR Systems Assurance Document for additional information about drive magazine sizes and placement for your specific storage system configuration. Remove a magazine from the container. Slide the magazine out of the container protective sleeve.
Figure 50 Pattern for Loading Initial Drive Magazines into the Drive Chassis NOTE: Depending on the number of drive chassis and drive magazines in your system, the drive magazine loading pattern may differ than the pattern depicted in “Pattern for Loading Initial Drive Magazines into the Drive Chassis” (page 60). Table 12 Procedure for Loading Drive Magazines 60 Step Procedure 1 Beginning with the drive chassis nearest to the bottom of the cabinet, insert a magazine into slot 0 of the drive cage.
Inserting the Drive Magazines To insert the drive magazines: 1. Locate the drive chassis nearest to the bottom of the cabinet and insert the magazine into slot 0 within that drive chassis. Use the notch at the top of the drive bay as a guide while inserting the magazine (“Inserting a Drive Magazine Into a Drive Chassis” (page 61)) NOTE: For systems that occupy multiple cabinets, drive chassis numbers continue at the bottom of the next cabinet and progress through the top of the cabinet.
to fully seat the drive magazine in the chassis. When fully seated, the drive handle of the magazine rests against the front of the drive chassis housing. CAUTION: Drive magazines should glide in easily. If a drive magazine does not insert smoothly, do not force it. Check if the magazine is properly aligned with the guide notch at the top of the drive bay and apply moderate pressure toward the left side of the magazine while inserting.
If the drive magazine allocation for this system differs from the standard allocation pattern, it may be necessary to remove some drive magazine filler panels before installing the drive magazines. Insert a screwdriver into the filler panel slot and leverage the drive magazine filler panel out. To install drive magazine filler panels, place a drive magazine filler panel over the front opening of each empty drive bay in the system.
5 Checks and Setup before Powering On the Storage System This chapter describes how to connect the power cords and complete the power on sequence for an HP 3PAR T-Class Storage System. Checking Power Cord Connections The storage systems arrive with all internal power cords configured and connected. Before powering on the storage system, verify the following: • All AC cords are correctly configured and have not become loose during shipping.
Figure 55 PDU Power Banks Each power bank supplies a maximum current of 12A at 220 VAC. PDUs have a cable tie system securing the AC cords to prevent accidental disconnection. Power supplies have cord locks securing the AC cords to prevent accidental disconnection (Figure 56 (page 65) and Figure 57 (page 66)).
Figure 57 Cord Lock with Adjustable Fastener Strap on Drive Chassis Power Supply Before powering on the storage system, check the cord locks on the power supplies to confirm the AC cords have become loose during shipping. Also check the AC cords and cable ties on the PDUs to verify cord connections are secured. Redundant Power Before powering on the storage system, verify the system has a valid redundant power configuration. In addition, verify each PDU connects to an independent AC input source.
Figure 58 Redundant Power Configuration (T400) NOTE: “Redundant Power Configuration (T800)” (page 68) applies only to the T800 configuration with front and rear PDUs.
Figure 59 Redundant Power Configuration (T800) Checking Battery Backup Unit Cable Connections Battery cables connect the storage system Battery Backup Units (BBU) to the controller nodes. The BBUs are housed in one or more battery trays sitting above and below the controller nodes. A battery tray can hold a maximum of four BBUs (Figure 60 (page 69)).
Figure 60 Lower Battery Tray and BBUs NOTE: BBUs are inserted in the front of the storage system. Each BBU contains two independently functioning batteries. BBUs have batteries resting vertically, with battery A above battery B. (Figure 20 (page 32)). Figure 61 Battery Backup Units Have Batteries Resting Vertically Storage systems in HP 3PAR cabinets arrive with all BBUs installed and cabled.
Figure 62 Battery Backup Unit Cabling Configurations for Storage Systems Before powering on the storage system, verify the battery cables have not loosen during shipping. In addition, verify the BBUs are cabled correctly: • Each controller node connects to two BBUs through battery cables running from the two power supplies at the rear of the node. • Each battery cable runs from a battery output connection on a controller node power supply to an input A or input B connection on the BBU.
1. 2. Access the rear of the system and verify all power supplies are set to the OFF position. Verify the safety breakers on all four of the PDUs are set to the OFF position, as shown in “Setting the Safety Breakers to the OFF Position” (page 71). Figure 63 Setting the Safety Breakers to the OFF Position 3. 4.
Figure 64 Routing the Main Power Cords NOTE: To route power cords through the upper access opening of the cabinet, it is first necessary to remove one or both side panels as described in “Removing Side Panels” (page 51). 6. Plug each of the main power cords into a dedicated single-phase 200-240 VAC 30-A grounded electrical circuit.
Figure 65 Preventing Accidental Disconnection of the Main Power Cord (NEMA L6-30) WARNING! The main power cords include safety features to prevent plugging them into electrical circuits not compatible with the storage system. To prevent serious injury to people and damage to equipment, do not override this feature by using outlet adapters, altering power cords, or modifying power receptacle connectors.
1. Align the rear door with the two hinges near the top and bottom of the cabinet frame, as shown in “Aligning the Rear Door with the Hinges” (page 74).
2. Engage the hinges by squeezing the two release pins on the hinges and pushing the hinges to the left, as shown in “Engaging the Hinges on the Rear Door” (page 75). Figure 67 Engaging the Hinges on the Rear Door Replacing the Side Panels and Filler Panels Replace any side panels or filler panels removed during cabling and positioning of the storage system.
1. Use an adjustable wrench to turn the upper locking nuts clockwise completely (“Releasing the Locking Nut” (page 76)). Figure 68 Releasing the Locking Nut 2. Using an adjustable wrench, turn each foot counterclockwise until completely raised (“Raising the Leveling Foot” (page 76)). Figure 69 Raising the Leveling Foot NOTE: If the operating site has raised floor tiles with cutouts to facilitate cable routing, position the cabinets over the cutouts in the tiles.
Verifying Acclimatization Before being powered on, the storage system may require up to 24 hours to acclimatize to the new operating environment when outside-to-inside conditions vary greatly. If there is a possibility the storage system or its components may have experienced environmental changes during transit, verify the amount of acclimatization time for the storage system before proceeding with the power-on sequence.
6. After approximately 10 minutes, check the status of all LEDs for proper operation. Refer to “Understanding LED Status” (page 79) for specifics. NOTE: At this time, the node system LEDs appear solid green because the system has not been initialized.
6 Understanding LED Status Using the Component LEDs HP 3PAR T-Class Storage System components have LEDs to indicate the hardware is properly functioning and to help identify errors. These LEDs help diagnose basic hardware problems. You can quickly identify hardware problems by examining the LEDs on all the components. Use the tables and diagrams in the following sections to verify the hardware is properly functioning.
Figure 72 Connections and LEDs on the DC4 Drive Cage FC-AL Modules Consult Table 13 (page 80) to verify proper functioning of the DC4 drive cage FC-AL modules. Table 13 Drive Cage DC4 FC-AL Module LED Displays LED Appearance Meaning RX Steady green light Indicates the presence of a small form-factor pluggable optical transceiver (SFP) and a valid signal from the node. No light Indicates there is not a connection to the node or an SFP is not installed.
Table 13 Drive Cage DC4 FC-AL Module LED Displays (continued) LED Hot-plug Split Mode 4 GB/s Appearance Meaning Steady amber light Normal, initial indication for two seconds upon power up. Otherwise, indicates FC-AL module error or other cage error. If both FC-AL modules have a steady light, the temperature of a disk drive has exceeded 55°C, or a power supply has failed.
Table 14 Drive Magazine LED Displays LED Appearance Meaning DC4 Drive Magazine Status Steady green light Indicates the drive magazine is functioning properly. Steady amber light Indicates a drive magazine error, or one or more drives are bypassed on at least one path. Disk status DC4 Hot-plug Quick flashing, or 20 percent-on and Indicates disk is not spun up but is 80 percent-off green light functioning. Steady green light Indicates the disk is spun up and waiting for a command.
Consult Table 15 (page 83) to verify proper functioning of controller nodes. Table 15 Controller Node LED Displays LED Appearance Meaning Disk Hot-plug Steady amber light Indicates the internal disk is ready for hot-plug. No light. Indicates the internal disk is not ready for hot-plug. Steady amber light In combination with the Status LED blinking green three times per second, indicates the controller node is prepared for removal.
Figure 75 4-Port Fibre Channel LEDs Consult Table 16 (page 84) to verify proper function of the Fibre Channel adapter LED. Table 16 Fibre Channel Port Status LED Indications (4-Port Adapter) LED Appearance Meaning No light Wake-up Failure (broken device). Steady green light Normal -- Link up at 2 or 4 Gbps. Flashing green light Link down or disconnected. QLogic iSCSI Port LEDs The QLogic iSCSI adapter contains two ports and each port has one LED.
Figure 76 iSCSI Adapter LEDs Consult Table 17 (page 85) to verify the proper functioning of QLogic iSCSI adapter LEDs. Table 17 iSCSI Adapter Port LED Indications LED Appearance Meaning Steady green Indicates a link is established. Flashing green Indicates receiving or transmitting activity. Off Indicates no connection or active link. Ethernet Adapter LEDs The controller node Ethernet adapter has two LEDs (Figure 77 (page 86)).
Figure 77 Ethernet Adapter LEDs Consult Table 18 (page 86) to verify the proper functioning of Ethernet adapter LEDs. Table 18 Ethernet Adapter Indications LED Appearance Meaning ACT/LNK Steady green light Valid link partner. Flashing green light Data activity. No light ACT/LNK is off. Steady yellow light 1000 Mb/sec mode. Steady green light 100 Mb/sec mode. No light 10 Mb/sec mode. Speed Power Supply LEDs Power supply units are located at the rear of all drive cages and controller nodes.
Figure 78 Power Supply LEDs NOTE: The appearance of the drive chassis and controller node power supplies can vary slightly according to manufacturer and location. Consult Table 19 (page 87) to verify proper operation of the power supplies. Table 19 Power Supply LED Displays LED Appearance Meaning Power supply status Steady green light Indicates the power is on. Steady amber light Indicates a power supply error. No light Indicates a broken connection to the AC power source.
BBUs contain two batteries, labeled battery A and battery B. The BBUs also include the following LEDs (Figure 79 (page 88)): Figure 79 Battery Backup Unit LEDs (Magnetek) Consult Table 20 (page 88) to verify proper functioning of the BBUs. Table 20 Battery Backup Unit LED Displays LED Appearance Meaning Battery A status LED Steady green light Indicates battery A is charged. Flashing green light Indicates the battery is undergoing a test. Steady amber light Indicates a battery error.
Service Processor LEDs Wintec Service Processor The Wintec service processor LEDs are defined in the following section. The LED's are located at the top of the Wintec service processor (Figure 81 (page 89)). Figure 81 Wintec Service Processor LEDs Consult Table 21 (page 89) to verify proper functioning of the Wintec service processor displays. Table 21 Wintec Service Processor LED Displays LED Appearance Meaning Hard Disk No light Indicates no hard drive activity.
Figure 82 Supermicro Service Processor LEDs Consult Table 22 (page 90) to verify proper functioning of the Supermicro service processor displays. Table 22 Supermicro Service Processor LED Displays LED Appearance Meaning Overheat No light Indicates the system is normal Steady red light Indicates the system is overheated No light Indicates no network activity Flashing green light Indicates network activity Steady green light Indicates network is linked No light Indicates no network activity.
Consult Table 23 (page 91) to verify proper functioning of the Supermicro II service processor displays. Table 23 Supermicro II Service Processor Front-Panel Displays LED Appearance Meaning Power No light Indicates the service processor is off. Steady green light Indicates the service processor is on. No light Indicates no hard drive activity. Flashing amber light Indicates hard drive activity. No light Indicates the port is not connected.
7 Initializing the Storage System Software This chapter describes how to complete the installation of a storage system by setting up and configuring the storage system software and service processor software. You must execute these scripted setup procedures from the maintenance PC after powering on the system. NOTE: In this and other chapters, the command-line examples use bold type to indicate user input and to denote variables. Examples may not match the exact output of your system.
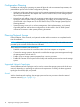
2. From the console menu, select option 1 for Out of The Box Procedure. 3PAR Console Menu 1400293-1 3.1.1.xxx 1. Out Of The Box Procedure 2. Run ootb-stress-analyzer 3. Re-enter network configuration 4. Update the CBIOS 5. Enable or disable CLI error injections 6. Perform an IDE rescue 7. Set up the system to wipe and rerun ootb 8. Cancel a wipe 9. Perform a deinstallation 10. Update the system for recently added hardware (admithw) 11. Check system health (checkhealth) 12.
3. Set a. b. c. d. up the time zone for the operating site as follows: Select a location from the list, type the corresponding number , and press ENTER. Select a country, type the corresponding number , and press ENTER Select a time zone region, type the corresponding number , and press ENTER. Verify the time zone settings are correct, type 1 , and press ENTER. NOTE: The system automatically makes the time zone change permanent.
7. Verify the number of drive magazines and physical disks in the storage system. Examining the port states... All ports are in acceptable states. Examining state of new disks... Found Found Found Found Found < < < < < 4 8 8 8 8 > > > > > HUA722020ALA330 disks HVIPC0300GBFC15K disks HVIPC0600GBFC15K disks SEGLE0300GBFC15K disks SEGLE0600GBFC15K disks Cluster has < 36 > total disks in < 9 > magazines. < 36 > are new. Now would be the time to fix any disk problems.
9. The system checks disk states and firmware versions. If there are no problems, the script continues automatically. Continue onto step 10. Issuing admitpd... Please wait a moment... admitpd completed with the following results... Found Found Found Found Found < < < < < 4 8 8 8 8 > > > > > HUA722020ALA330 disks HVIPC0300GBFC15K disks HVIPC0600GBFC15K disks SEGLE0300GBFC15K disks SEGLE0600GBFC15K disks Cluster has < 36 > total disks in < 9 > magazines. < 36 > are valid.
60R3-0C1G-60R3-2C1G-60R3-0C9G-70R3-0C1G 60RK-0C05-ATX2-3TAH-64LF-JG3X-WHMA-9QVW 8M56-BDH1-ZWW4-WHFA-LV83-4FTX-KJRX-ZZ8E ... The following features will be enabled: Domains (No expiration date) Thin Provisioning (1024G) (No expiration date) Virtual Copy (No expiration date) Are these the expected changes? (yes/no) y License key successfully set. If the license information is not correct, type c and press ENTER to continue with the system setup.
i. Verify the IP address information is correct. Type y and press ENTER. Please verify the following: IP Address: xxxx Netmask: xxxx Nodes: 0 2 3 Default route through gateway xxxx, via xxxx Speed and duplex will be autonegotiated. No NTP server. Does this appear to be correct? [y/n] y Updated netc configuration in the PR. SIGHUP has been sent to the netc controller. should reach the new state momentarily. The network configuration 16.
The service processor features two network configuration options to enable communication access during the SPMOB script. • SP Mode—enables the Customer Controlled Access (CCA) setting to control inbound/outbound communication access via SSH session. Refer to “Configuring the SP with SP Mode” (page 110) to enable the feature. • Secure Network Mode—enables HP 3PAR Secure Service Agent (SSA) setting to control inbound/outbound communication access via HTTPS.
Using the Service Processor Setup Wizard This procedure shows you how to use the SP Setup Wizard to install and configure a service processor. 1. The Welcome page is displayed. 2. Click Next to continue. The Configure Server Processor Networking page appears.
Enter the following information: Field Description Service Processor ID A unique and static identifier for this SP. NOTE: Enter the Service Processor ID only when you set up this SP for the first time. 3. Service Processor hostname The host name that you want to apply to this SP. IP Address The IPv4 address you want to assign to this SP. Subnet Mask Optional. If you do not want to accept the default subnet mask, enter a custom setting. Gateway Optional.
Enter information in the following fields: Field Description Remote Support Level • Active: HP 3PAR support uses your remote support settings to maintain your Service Processor and HP 3PAR storage system. Log files are automatically sent to monitor the health of your system. NOTE: HP recommends that you use this option. • Passive: Log files are automatically sent to HP 3PAR support to monitor the health of your system. Remote maintenance is disabled.
5. Click Next. The Summary page displays.
Settings will automatically be applied on this apply settings screen. After the Configure networking setting is applied, the Connect to the new IP address dialog displays with instructions to continue after the wizard page refreshes to the new IP address. After the wizard refreshes to the new IP address, a final Apply Settings displays. 6. Click Next. The Apply Settings page displays.
7. 8. The system will apply the configured settings and display a confirmation dialog box. Click OK to accept the settings you just set up. Click Next. The Apply Settings page displays with the active settings.
9. If the operation is successful, click Finish. The Finish page displays.
10. Do one of the following: • Click Finish to close the wizard. • Click the Launch button next to Storage System Setup Wizard to start the Storage System Setup Wizard. • Click the Launch button next to Service Processor Onsite Customer Care for support through Service Processor Onsite Customer Care (SPOCC). • If there are errors in the setup, do one of the following: Server Processor ID failed with the following error: Failed to set SP ID.
1. 2. 3. Click Stop to return to the wizard. Click the Prev button to return to Step 2 of the wizard. Verify the Server Processor ID Set date and time failed with the following error: Failed to set time zone. Troubleshooting recommendations: 1. Click Stop to return to the wizard. 2. Click the Prev button to return to Step 4 of the wizard. 3. Verify the Server Processor ID Configure networking failed with the following error: Failed to configure DNS. Troubleshooting recommendations: 1.
Troubleshooting recommendations: 1. Click Stop to return to the wizard. 2. Click the Prev button to return to Step 3. 3. Verify the remote support settings. Restart Service Processor failed with the following error: Failed to restart the SP Troubleshooting recommendations: 1. Wait for one minute. 2. Click the Retry button.
1. 2. Wait for one minute Click the Retry button. High Speed Setup Use the following procedure to set up the SP at a site where an Ethernet connection to the customer network is used to monitor the storage system and for all external communications with the service processor. Remote control of the service processor may or may not be permitted. If permitted you must also use the customer network.
Please enter your selection [X]: 1 5. Type 1 to continue with the SPMOB and press ENTER. Type of install Enter Control-C at any time to abort this process How do you want to configure this SP? 1 2 X ==> Continue with spmob ( new site install ) ==> Restore from a backup file ( SP rebuild/replacement ) None of the above. Cancel and Exit 1 6. Type No to retain the current value or enter the current value of the Service Processor ID (SPID) if applicable and press ENTER.
10. Press ENTER to accept the default gateway address shown in brackets, or type an alternate default gateway address and press ENTER. The setup script suggests a default gateway address based on the supplied IP address. Please enter the IP address of a default gateway, or NONE []: 11. Press ENTER to accept the default network speed or enter the network speed and press ENTER. Please enter the network speed (10HD,10FD,100HD,100FD,1000HD,1000FD,AUTO) [AUTO] 12.
16. If you answered no in step 15, type the hostname for an alternate connection server and press ENTER. SP Network Parameters Enter Control-C at any time to abort this process Please enter the fully qualified hostname for the Connection Server (use only alpha numeric or . - _) - or QUIT to abort 17. If the connection portal (CP) does not require connection to proxy services, type no and press ENTER If you answered no, skip to step 20.
21. Type yes to configure the SP firewall in permissive mode and press ENTER. SP Network Parameters Enter Control-C at any time to abort this process The SP firewall protects the SP and the customer network from unauthorized use. It can be configured in ‘permissive’ mode to allow any host to connect to the SP via SSH and HTTP.
Enter Control-C at any time to abort this process Please enter the current date in MM/DD/YYYY format [] : 26. Type the current time in HH:MMformat or press ENTER to accept the default time indicated by the installation script. Basic Date and Time Enter Control-C at any time to abort this process Please enter the time in HH:MM format [
CAUTION: If you receive any Password: prompts during this process, this indicates the nodes in the system have not been properly configured. Verify the IP addresses on the SP and controller nodes. Use the red crossover cable to connect the highest node port ETH 0 to SP ETH 0 to establish a private network. If the problem still exists, do not proceed any further. Contact HP 3PAR Technical Support for assistance. 29. Press ENTER to conclude MOB configuration.
NOTE: The customer must have the minimum network configuration to allow a Secure Network Mode enabled SP to communicate with the collector server. 1. 2. Connect the maintenance PC to the service processor through a serial connection, as described in “Connecting to the Service Processor” (page 193), then power on the service processor and log in as the root user. Type yes to begin the service processor setup script (SPMOB) and press ENTER.
Enter Control-C at any time to abort this process How do you want to configure this SP? 1 2 X ==> Continue with spmob ( new site install ) ==> Restore from a backup file ( SP rebuild/replacement ) None of the above. Cancel and Exit 1 6. Type No to retain the current value or enter the current value of the Service Processor ID (SPID) if applicable and press ENTER. Do you need to change the Service Processor Id (SPID) from its current value of SPXXXXX? (y or n) n 7.
11. Press ENTER to accept the default network speed or enter the network speed and press ENTER. Please enter the network speed (10HD,10FD,100HD,100FD,1000HD,1000FD,AUTO) [AUTO] 12. Type the static IPv4 address assigned to the domain server or none and press ENTER. SP Network Parameters Enter Control-C at any time to abort this process Please enter the IPv4 address (or blank separated list of addresses) of the Domain Name Server(s) or 'none' if there will not be any DNS support: [?]:
16. Type the static hostname or IP address assigned to the HP 3PAR Secure Service Policy Manager and press ENTER. Please enter the hostname or I/P address of the 3PAR Secure Service Policy Manager [?]: 17. Type the port number of the HP 3PAR Secure Service Policy Manager or press ENTER to accept the default port number. Please enter the port number on which to contact [default]: [XXXX] 18.
23. Type the proxy User ID and press ENTER. Please enter the proxy user id: alphanumeric value 24. Type the proxy password for User ID [alphanumeric value] and press ENTER. Retype the password to confirm and press ENTER. Please enter the password for id 'username id': alphanumeric value Please re-enter (confirm) the password: alphanumeric value 25. Type yes to confirm that the data is correct and press ENTER.
29. Type the hostname or IP address of the http proxy server and press ENTER. Please enter the hostname or I/P address of the http proxy server [?]: 30. Press ENTER to accept the default port number or type the port number of the http proxy server and press ENTER. What port number should be used on the http proxy server? [default]: [XXXX] 31. Type no to not require proxy authentication and press ENTER. If you indicated no, skip to step 34.
Enter the IP address of an external NTP server 36. Type yes to configure the SP firewall in permissive mode and press ENTER. SP Network Parameters Enter Control-C at any time to abort this process The SP firewall protects the SP and the customer network from unauthorized use. It can be configured in ‘permissive’ mode to allow any host to connect to the SP via SSH and HTTP.
39. Verify the time zone setting is correct, then type 1 and press ENTER. Choosing option 2 restarts the time zone configuration. NOTE: The system automatically makes the time zone change permanent. Disregard the instructions on the screen for appending the command to make the time zone change permanent. 40. Press ENTER to accept the default date in brackets, or type the current date in MM/DD/YYYY format and press ENTER.
or by using "spmaint" option 6.4.2 AFTER the moment of birth to invoke (or force) a key exchange. You may have to manually add any existing InServ clusters in order to perform the key exchange. Do you wish to use the DEFAULT, installed Site key files? (y or n) y 44. Press ENTER to conclude MOB configuration. InServ configuration is no longer done during the Moment Of Birth. Use spmaint to install the InForm OS software on the SP and add the InServ configuration to the SP after a successful MOB.
Mixed Connectivity Setup Use the following procedure to set up the service processor at a site where monitoring the storage system and external communication occurs through the customer network. Remote control of the service processor occurs through a serial modem connection using a customer-supplied dialup number. 1.
5. Type 1 to continue with the SPMOB and press ENTER. Type of install Enter Control-C at any time to abort this process How do you want to configure this SP? 1 2 X ==> Continue with spmob ( new site install ) ==> Restore from a backup file ( SP rebuild/replacement ) None of the above. Cancel and Exit 1 6. Type No to retain the current value or enter the current value of the Service Processor ID (SPID) if applicable and press ENTER.
10. Press ENTER to accept the default gateway address, or type an alternate default gateway address and press ENTER. The setup script suggests a default gateway address based on the supplied IP address. Please enter the IP address of a default gateway, or NONE []: 11. Type yes to allow inbound and/or outbound files transfers and press ENTER. Will this ethernet interface be used for inbound and/or outbound files transfers (yes or no) [no]? yes 12.
- Sequence to disable call waiting (ex. #70) - When more then one sequence is required you may have to insert one, 16. To use the HP 3PAR Connection Server, press ENTER, or type yes and press ENTER and then skip to step 20. To specify an alternate connection server, type no , press ENTER, and continue to step 17. Will this SP use the 3PAR Connection Server? ( yes or no ) [yes] [enter] 17. If you answered no in step 16, type the host name for an alternate connection server and press ENTER.
20. Type the external NTP server address (if available) and press ENTER. If unavailable, type none and press ENTER. Network Time Server Enter Control-C at any time to abort this process Please enter the I/P address of an external NTP server, or a blank delimited list if more than one is desired, or 'none' if there will not be any time server [?]: Enter the IP address of an external NTP server 21. Type yes to verify the supplied network information and press ENTER.
Please enter the current date in MM/DD/YYYY format [] : 25. Type the current time in HH:MMformat or press ENTER to accept the default time indicated by the installation script. Basic Date and Time Enter Control-C at any time to abort this process Please enter the time in HH:MM format [
28. Press ENTER to conclude MOB configuration. InServ configuration is no longer done during the Moment Of Birth. Use spmaint to install the InForm OS software on the SP and add the InServ configuration to the SP after a successful MOB. Press ENTER to continue. NOTE: After completing the SPMOB process, additional InForm OS files must first be installed in order to communicate and add a storage system. To install InForm OS files, refer to “Installing HP 3PAR OS Files” (page 145).
3. Type no to indicate the site is not secured and press ENTER. CAUTION: If you answer yes, the service processor will not be able to communicate with HP Central. A complete rebuild of the SP is required if the SP needs to establish communication link with HP Central. Site Security Level Enter Control-C at any time to abort this process A Secure Site is a site where the customer will NEVER allow a 3PAR SP to access the public internet.
7. Accept the default service processor name (in brackets) by pressing ENTER, or type an alternate name and press ENTER. The default service processor name is the SPID. Accepting the default is recommended. SP Network Parameters Enter Control-C at any time to abort this process Please enter the host name [SPXXXXX]: [enter] 8. Type the static IP address assigned to the service processor and press ENTER.
12. Type yes to use the modem for file transfer and press ENTER. Will inbound and/or outbound files transfers be allowed via the modem(yes or no)? [yes] [enter] 13. For technical support and services through remote location, press ENTER or type yes and press ENTER, then continue to step 14. To prohibit remote control of the service processor, type no and press ENTER, then skip to step 15.
have to insert one, 17. Press ENTER to use the HP 3PAR Connection Server, or type yes and press ENTER and then skip to step 21. To specify an alternate connection server, type no , press ENTER, and continue to step 18. Will this SP use the 3PAR Connection Server? ( yes or no ) [yes] [enter] 18. If you answered no in step 17, type the host name for an alternate connection server and press ENTER.
21. Type the external NTP server address (if available) and press ENTER. If unavailable, type none and press ENTER. Network Time Server Enter Control-C at any time to abort this process Please enter the I/P address of an external NTP server, or a blank delimited list if more than one is desired, or 'none' if there will not be any time server [?]: Enter the IP address of an external NTP server 22. Typeyes to verify the supplied network information and press ENTER.
25. Press ENTER to accept the default date in brackets, or type the current date in MM/DD/YYYY format and press ENTER. Basic Date and Time Enter Control-C at any time to abort this process Please enter the current date in MM/DD/YYYY format [] : 26. Type the current time in HH:MMformat or press ENTER to accept the default time indicated by the installation script. Basic Date and Time Enter Control-C at any time to abort this process Please enter the time in HH:MM format [
CAUTION: If you receive any Password: prompts during this process, this indicates the nodes in the system have not been properly configured. Verify the IP addresses on the SP and controller nodes. Use the red crossover cable to connect the highest node port ETH 0 to SP ETH 0 to establish a private network. If the problem still exists, do not proceed any further. Contact HP 3PAR Technical Support for assistance. 29. Press ENTER to conclude MOB configuration.
Are you ready to configure the SP at this time? (yes or no) [yes]: [enter] 3. Type yes to indicate the site is secured and press ENTER. CAUTION: If you answer yes, the service processor will not be able to communicate with HP Central. A complete rebuild of the SP is required if the SP needs to establish communication link with HP Central.
6. Type No to retain the current value or enter the current value of the Service Processor ID (SPID) if applicable and press ENTER. Do you need to change the Service Processor Id (SPID) from its current value of SPXXXXX? (y or n) n 7. Accept the default service processor name (in brackets) by pressing ENTER, or type an alternate name and press ENTER. The default service processor name is the SPID. Accepting the default name is recommended.
Will this SP be allowed to be remotely controlled(yes or no)? [yes] (Replying 'yes' will allow Remote Operations sessions from a Connection Portal) no 13. Type no to not use the HP 3PAR Connection Portal and press ENTER. SP Network Parameters Enter Control-C at any time to abort this process Will this SP use the 3PAR Connection Portal? ( yes or no ) [yes] 14. Answer the prompts about your proxy server.
The SP firewall protects the SP and the customer network from unauthorized use. It can be configured in 'permissive' mode to allow any host to connect to the SP via SSH and HTTP. Do you wish to configure the SP firewall in 'permissive' mode? [yes/NO] yes NOTE: Configuring the SP firewall in permissive mode enables access to the SP from any host on the local area network. 17. Type yes to verify the supplied network information and press ENTER.
If this is a REPLACEMENT SP, or there is already an InServ running at this site with which this SP must communicate, do one of the following: 1) If you have external media containing the currently deployed key pair (on CD or floppy), then answer NO and provide the Keys to use. 2) If you do not have a copy of the current keys, answer YES and force a key-exchange by MANUALLY adding the cluster during the SP Moment of Birth, or by using "spmaint" option 6.4.
25. Monitor the system while the service processor uses the site key. When the system configuration process is complete, the following message appears: (....) *** starting final MOB phase Fix passwords enabling key change... Disabling sendmail... verifying postfix status... Setup to run all ST/SP tasks at boot time Cleanup MOB Updating PAM settings Rebooting.... The service processor automatically restarts. Continue on to “Installing HP 3PAR OS Files” (page 145).
2 3 4 5 6 7 X ==> ==> ==> ==> ==> ==> Exit Network Configuration InServ Configuration Management InServ Product Maintenance Local Notification Configuration Site Authentication Key Manipulation Interactive CLI for an InServ 1 9. Verify the installation is accurate and press ENTER to return to SPMAINT menu. 1.1 Display SP Version SP Software Version SP-2.5.1.GA-15 SP Base Image Version: SP Version: SP Patches: InFormOS release (3.1.1): More detail is available in the 3.1-8 2.5.1.GA-15 3.1.1.
X Exit 3 4. Type 2 to Add a new InServ and press ENTER. SP - InServ Configuration Manipulation Enter Control-C at any time to abort this process 1 2 3 4 X ==> Display InServ information ==> Add a new InServ ==> Modify an InServ config parameters ==> Remove an InServ Return to the previous menu 2 5. Type the static IP address of the system (InServ) and press ENTER.
6. After successfully adding the system (InServ), press ENTER to return to the SP menu. Adding to firewall rules on interface eth0 If you see any Password: prompts during this process it is an indication that the nodes in the InServ have NOT been properly configured!! DO NOT CONTINUE IF THIS IS THE CASE! Contact 3PAR technical support! communicating with using base key... base key ok interrogating for version number... Version 2.5.1.
Figure 84 Verifying the SP Status Setting up the Service Processor 149
5. Verify the service processor outbound communication ability and that the service processor can transfer files by clicking Support > SP Network Configuration Menu > Connection Portal Control > Test CP Connection. See “Verifying the Service Processor’s Outbound Communication” (page 150). Figure 85 Verifying the Service Processor’s Outbound Communication A new window opens displaying the communication details (“Viewing the Service Processor Communication Details” (page 150)).
1. 2. 3. 4. 5. 6. 7. Connect the maintenance PC to the service processor as described in “Connecting to the Service Processor” (page 193). If necessary, log into the service processor maintenance interface. Select option 2 for Network Configuration and press ENTER. Select option 3 for Firewall Manipulation and press ENTER. Select option 3 for Alter Public network firewall rules and press ENTER. Select option 1 for Add a new host and press ENTER.
NOTE: For more information about the commands used in this section, see the HP 3PAR InForm OS Command Line Interface Reference. To set the personas for ports connecting to host computers: 1. From the service processor CLI session, verify connection to a host before defining a host: 192.168.46.249 cli% showhost 2. Define a new system host as follows: 192.168.46.249 cli% createhost -persona ...
3. Create a VLUN of the virtual volume for export to the host. 192.168.46.249 cli% createvlun test_vv test_lun_num 4. 5. Verify the host can access the VLUN. Repeat step 1 through 4 for each host. 6. From the service processor, type exit to stop the CLI session, then type xand press ENTER to return to the service processor main menu. Type x and press Enter again to exit service processor maintenance. Type exit and press ENTER to log off the service processor.
Part III Deinstallation
8 Deinstalling the Storage System This chapter describes methods for deinstalling a T-Class Storage System. Use these procedures when removing storage systems from an operating site and when relocating systems without data to an alternate site.
NOTE: In this and other chapters, the command-line examples use bold type to indicate user input and to denote variables. Examples may not match the exact output of a particular system. Deinstalling the Storage System This section provides instructions for deinstalling storage systems. 1. Connect the maintenance PC to the highest numbered controller node, as described in “Connecting the Maintenance PC” (page 191), and log in as the console user.
Password: < password> 4. 5. From the console menu, type 9 to select the Perform a deinstallation menu option. When prompted, proceed with either shutting down the system or initializing the system chunklets. NOTE: hours. Depending on the size of the system disks, initializing the chunklets may take several NOTE: If you do not wait for the chunklets to be initialized, data still resides on the disks, but cannot be accessed easily.
8. 9. 15 16 17 18 19 ==> ==> ==> ==> ==> SP Process Control Parameters Maintain SP Software SP File maintenance deinstall SP ( Back-in-the-box ) Take a SPLOR X Return to previous menu When prompted, halt the service processor. Set all power breakers on the PDUs (eight per cabinet) to the OFF position (“Setting a Power Breaker on the PDU to the OFF Position” (page 158)). Figure 87 Setting a Power Breaker on the PDU to the OFF Position CAUTION: removal.
Figure 88 Coiling Main Power Cords 12. Disconnect all external connections from the host computer or computers to the storage system and remove these cables from the cabinet, leaving the internal Fibre Channel and service processor connections intact when possible. 13. Insert dust plugs into all system Fibre Channel ports and secure all Fibre Channel, Ethernet, and serial cables remaining inside the cabinet with the cable management system (“Securing Cables with the Cable Management Clips” (page 160)).
Figure 89 Securing Cables with the Cable Management Clips 14. Locate the wrist grounding strap provided with the storage system. Attach the grounding strap clip directly to an unpainted surface of the rack. 15. Use a #2 Phillips screwdriver to loosen the screws securing the drive magazine handles to the drive magazines (“Loosening the Screw on the Drive Magazine” (page 160)).
16. Place the drive magazine transport container or shipping containers near the storage system. Before opening the 30–magazine container, secure the wheels on the bottom of the container by engaging the brakes on the front wheels.5 To open the container, unlatch the rotary latches by raising the levers and turning them counterclockwise one half turn (“Unlatching the Drive Magazine Transport Container” (page 161)).
20. Raise the leveling feet on the cabinet. To raise a leveling foot, use an adjustable wrench to turn the locking nut clockwise until it is as low as possible (“Releasing the Locking Nut” (page 76)). Figure 92 Releasing the Locking Nut Use an adjustable wrench, turn the leveling foot counterclockwise until it is as high as possible (“Raising a Leveling Foot” (page 162)). Use the wrench to completely lock the locking nut.
Packing the Storage System in the Type 1 Shipping Container NOTE: Refer to “Unpacking the Cabinet” (page 42) for information about Type 1 shipping containers. 1. 2. 3. With at least one person pushing from the rear of the cabinet and a second person guiding the cabinet from the front, wheel the cabinet to the loading area. Place a pink poly antistatic bag over the storage system. These bags come shipped inside the wooden crate.
Figure 95 Unlatching a Rotary Latch 4. Lower the front panel of the shipping container to form a ramp and remove any packing material inside. With at least one person facing the container and one or more people guiding the storage system from behind, push the cabinet up the ramp and guide it into the container (“Guiding the Cabinet Into the Container” (page 165)).
Figure 96 Guiding the Cabinet Into the Container Deinstalling the Storage System 165
5. Replace the foam packing at the front of the container, then raise the ramp and secure the latches (“Raising the Ramp to Close the Cabinet” (page 166)). Figure 97 Raising the Ramp to Close the Cabinet WARNING! To avoid possible injury or damage to equipment, you must use a pallet jack or similar device to move the cabinet after loading it into the shipping container.
Figure 98 The Front of the Shipping Container To unlatch a rotary latch, raise the lever and turn counterclockwise one half turn, as shown in “Unlatching a Rotary Latch” (page 167). Figure 99 Unlatching a Rotary Latch 4. 5. Lower the front panel of the shipping container to form a ramp and remove any packing material inside. Attach the pull straps to the inside walls of the shipping container to assist with future cabinet removal (“Preparing the Shipping Container” (page 168)).
Figure 100 Preparing the Shipping Container 6. With at least one person facing the container and one or more people guiding the storage system from behind, push the cabinet up the ramp and guide it into the container. CAUTION: You must place the storage system into the container with front of the storage system (bezels) facing outward. 7. Replace the foam packing at the front of the container (“Replacing Packing Foam” (page 169)).
Figure 101 Replacing Packing Foam 8. Raise the ramp and secure the latches. WARNING! To avoid possible injury or damage to equipment, you must use a pallet jack or similar device to move the cabinet after loading it into the shipping container.
9 Support and Other Resources Contacting HP For worldwide technical support information, see the HP support website: http://www.hp.
For information about: See: Migrating data from one HP 3PAR storage system to another HP 3PAR-to-3PAR Storage Peer Motion Guide Configuring the Secure Service Custodian server in order to monitor and control HP 3PAR storage systems HP 3PAR Secure Service Custodian Configuration Utility Reference Using the CLI to configure and manage HP 3PAR Remote Copy HP 3PAR Remote Copy Software User’s Guide Updating HP 3PAR operating systems HP 3PAR Upgrade Pre-Planning Guide Identifying storage system components
For information about: See: Planning for HP 3PAR storage system setup Hardware specifications, installation considerations, power requirements, networking options, and cabling information for HP 3PAR storage systems HP 3PAR 7200, 7400, and 7450 storage systems HP 3PAR StoreServ 7000 Storage Site Planning Manual HP 3PAR StoreServ 7450 Storage Site Planning Manual HP 3PAR 10000 storage systems HP 3PAR StoreServ 10000 Storage Physical Planning Manual HP 3PAR StoreServ 10000 Storage Third-Party Rack Physic
Initializing and using the Service Processor HP 3PAR Service Processor Software User Guide: Service Edition Upgrading the Service Processor HP 3PAR Service Processor Software Upgrade Instructions: Service Edition Troubleshooting the Service Processor HP 3PAR Service Processor Troubleshooting Guide: Service Edition Remotely servicing all storage systems Remotely servicing HP 3PAR storage systems HP 3PAR Secure Service Collector Remote Operations Guide Servicing 7200 and 7400 storage systems Maintaini
Typographic conventions Table 24 Document conventions Convention Element Bold text • Keys that you press • Text you typed into a GUI element, such as a text box • GUI elements that you click or select, such as menu items, buttons, and so on Monospace text • File and directory names • System output • Code • Commands, their arguments, and argument values • Code variables • Command variables Bold monospace text • Commands you enter into a command line interface • Syste
10 Documentation feedback HP is committed to providing documentation that meets your needs. To help us improve the documentation, send any errors, suggestions, or comments to Documentation Feedback (docsfeedback@hp.com). Include the document title and part number, version number, or the URL when submitting your feedback.
Part IV Appendices
A Regulatory compliance notices Regulatory compliance identification numbers For the purpose of regulatory compliance certifications and identification, this product has been assigned a unique regulatory model number. The regulatory model number can be found on the product nameplate label, along with all required approval markings and information. When requesting compliance information for this product, always refer to this regulatory model number.
• Connect the equipment into an outlet on a circuit that is different from that to which the receiver is connected. • Consult the dealer or an experienced radio or television technician for help. Declaration of Conformity for products marked with the FCC logo, United States only This device complies with Part 15 of the FCC Rules.
Hewlett-Packard GmbH, HQ-TRE, Herrenberger Strasse 140, 71034 Boeblingen, Germany Japanese notices Japanese VCCI-A notice Japanese VCCI-B notice Japanese VCCI marking Japanese power cord statement Korean notices Class A equipment Class B equipment Japanese notices 179
Taiwanese notices BSMI Class A notice Taiwan battery recycle statement Turkish recycling notice Türkiye Cumhuriyeti: EEE Yönetmeliğine Uygundur Vietnamese Information Technology and Communications compliance marking Recycling notices English recycling notice Disposal of waste equipment by users in private household in the European Union This symbol means do not dispose of your product with your other household waste.
Bulgarian recycling notice Изхвърляне на отпадъчно оборудване от потребители в частни домакинства в Европейския съюз Този символ върху продукта или опаковката му показва, че продуктът не трябва да се изхвърля заедно с другите битови отпадъци. Вместо това, трябва да предпазите човешкото здраве и околната среда, като предадете отпадъчното оборудване в предназначен за събирането му пункт за рециклиране на неизползваемо електрическо и електронно борудване.
Finnish recycling notice Kotitalousjätteiden hävittäminen Euroopan unionin alueella Tämä symboli merkitsee, että laitetta ei saa hävittää muiden kotitalousjätteiden mukana. Sen sijaan sinun on suojattava ihmisten terveyttä ja ympäristöä toimittamalla käytöstä poistettu laite sähkö- tai elektroniikkajätteen kierrätyspisteeseen. Lisätietoja saat jätehuoltoyhtiöltä.
Greek recycling notice Απόρριψη άχρηοτου εξοπλισμού από ιδιώτες χρήστες στην Ευρωπαϊκή Ένωση Αυτό το σύμβολο σημαίνει ότι δεν πρέπει να απορρίψετε το προϊόν με τα λοιπά οικιακά απορρίμματα. Αντίθετα, πρέπει να προστατέψετε την ανθρώπινη υγεία και το περιβάλλον παραδίδοντας τον άχρηστο εξοπλισμό σας σε εξουσιοδοτημένο σημείο συλλογής για την ανακύκλωση άχρηστου ηλεκτρικού και ηλεκτρονικού εξοπλισμού. Για περισσότερες πληροφορίες, επικοινωνήστε με την υπηρεσία απόρριψης απορριμμάτων της περιοχής σας.
Lithuanian recycling notice Nolietotu iekārtu iznīcināšanas noteikumi lietotājiem Eiropas Savienības privātajās mājsaimniecībās Šis simbols norāda, ka ierīci nedrīkst utilizēt kopā ar citiem mājsaimniecības atkritumiem. Jums jārūpējas par cilvēku veselības un vides aizsardzību, nododot lietoto aprīkojumu otrreizējai pārstrādei īpašā lietotu elektrisko un elektronisko ierīču savākšanas punktā. Lai iegūtu plašāku informāciju, lūdzu, sazinieties ar savu mājsaimniecības atkritumu likvidēšanas dienestu.
Slovak recycling notice Likvidácia vyradených zariadení používateľmi v domácnostiach v Európskej únii Tento symbol znamená, že tento produkt sa nemá likvidovať s ostatným domovým odpadom. Namiesto toho by ste mali chrániť ľudské zdravie a životné prostredie odovzdaním odpadového zariadenia na zbernom mieste, ktoré je určené na recykláciu odpadových elektrických a elektronických zariadení. Ďalšie informácie získate od spoločnosti zaoberajúcej sa likvidáciou domového odpadu.
French battery notice German battery notice 186 Regulatory compliance notices
Italian battery notice Japanese battery notice Battery replacement notices 187
Spanish battery notice 188 Regulatory compliance notices
B Current and Voltage Requirements Table 25 (page 189) lists power requirements for storage system components. NOTE: All measurements listed in “Storage System Power Requirements” (page 189) are based on testing conducted at 208 VAC. Table 25 Storage System Power Requirements 2 Meter Cabinet Max. Watts per Cabinet (fully populated) 9,9841 Max. BTUs/hour per cabinet (fully populated) 34,066.
Table 25 Storage System Power Requirements (continued) Watts 61 47 BTUs/hour 208 160 Watts 73 65 BTUs/hour 249 222 Watts 59 44 BTUs/hour 193 144 Watts 44 22 BTUs/hour 152 77 4 x 600 GB FC Drive Magazine 4 x 1 TB NL Drive Magazine 4 x 2 TB NL Drive Magazine 1 2 3 Theoretical maximum based on branch circuit capacity. Under maximum load. Up to 10 drive magazines (40 drives) per drive chassis.
C Connecting the Maintenance PC Many storage system installation and upgrade procedures require a direct serial connection to a controller node from a maintenance PC. Installation and upgrade procedures also require a connection from the maintenance PC to the storage system service processor. This appendix describes how to obtain a direct serial connection to a controller node from a maintenance PC running a version of Windows Operating System (2000 or above).
Figure 102 Location of the Maintenance Port NOTE: A cable with adapter (P/N 180-0055) should be connected to the service processor. Disconnect the ethernet cable from the RJ-45 to DB-9 adapter attached to the service processor (P/N 180-0059). 3. Attach a DB9 female to RJ45 serial adapter assembly (P/N 180–0055) to the free end of the Ethernet cable and then insert it into the DB9 serial port (COM1) of the maintenance PC. Figure 103 Connecting the Maintenance PC to the Node NOTE: 4. 5. 6. 7.
8. In the COM1 Properties dialog box, select 57600 from the Bits per second list and select Xon/Xoff from the Flow control list, then click OK. HyperTerminal initiates a serial connection session with the controller node to which the maintenance PC is physically connected. 9. Press Enter to display the login prompt in the terminal window. A display similar to the one shown in “HyperTerminal Login Prompt” (page 193) appears. Figure 104 HyperTerminal Login Prompt 10.
Table 27 Standard terminal emulation connection settings for maintenance PC to a service processor (continued) Connection Settings Data bits 8 Parity none Stop bits 1 Flow Control Xon/Xoff Ethernet Connection To connect the maintenance PC to the service processor through the private Local Area Network using an Ethernet cable, you must first configure the LAN settings on the maintenance PC. To configure the LAN settings on the maintenance PC: 1.
Figure 108 Network and Dial-Up Connections Window 6. 7. Right-click the Local Area Connection icon to bring up the Local Area Connections Properties menu. Click Properties. The Local Area Connection Properties dialog box appears. 8. In the Local Area Connection Properties dialog box, double-click Internet Protocol (TCP/IP). The Internet Protocol (TCP/IP) Properties dialog box appears. 9.
enable you to perform various administrative and diagnostic tasks in support of both the storage system and the service processor. To log in to SPOCC using a Web browser: 1. Type the IP address of the service processor in the Web browser and then press Enter. NOTE: If using the crossover cable to the service processor ETH1 (Int) port, use IP address 10.255.155.54. The Service Processor Login screen appears. 2. 3. Click the Login button. Enter your user ID and password and click OK.
Figure 109 PuTTY Configuration Dialog Box 3. If connecting to the service processor for the first time, the PuTTY Security Alert dialog box appears. Click Yes. The PuTTY main window appears. 4. Type your user ID and press ENTER, then type your password and press ENTER. NOTE: If you do not have a user name and password, contact HP 3PAR Technical Support for assistance. Using SecureCRT To initiate a secure shell session between the maintenance PC and the service processor using SecureCRT: 1.
Figure 110 SecureCRT Window 3. 4. In the Quick Connect dialog box that appears, select the ssh2 option from the Protocol list. Type the IP address of the storage system in the Hostname box. Type your user ID in the Username box, and then click Connect. In the Enter Password dialog box, type your password and click OK. NOTE: If you do not have a user ID and password, contact HP 3PAR Technical Support for assistance.
Figure 111 Attaching the Blue Ethernet Cable NOTE: See “Serial Cable Pinouts” (page 200) for serial cable pinout diagrams. Figure 112 Wintec Service Processor Serial Port with Adapter Figure 113 Supermicro Service Processor Serial Port with Adapter Figure 114 Supermicro II Service Processor Serial Port with Adapter 3. 4. 5. 6. 7. 8. Power on the maintenance PC. On the taskbar, choose Start > Programs > Accessories > Communications > HyperTerminal.
9. In the HyperTerminal main window, click File and then click Properties. The New Sessions Properties dialog box opens. 10. Click the Settings tab. From the Emulation list, select either ANSIor VT100 to set the session emulation type, then click OK . 11. Enter your login ID and password to begin the maintenance procedures. NOTE: If you do not have a login ID and password, contact HP 3PAR Technical Support for assistance.
Table 30 Straight-Through DB9 Female to RJ45 Adapter Serial Cable Pinouts Color DB9 (Female) Pin RJ45 Pin Orange 2 2 Black 3 3 Green 5 5 Figure 116 (page 201) illustrates the pin locations and connections for the straight-through DB9 female to RJ45 adapter (P/N 180–0059).
D Performing Node Rescue This appendix describes the following methods for recovering a node that has been shut down or recently added to the system. It is possible to “rescue” a node with the following methods: • Nod to node rescue: this enables rescue of a node by manually connecting it to a working node. • CLI node rescue: this launches the startnoderescue command from a command line interface (CLI) to trigger detection and rescue of the blank or shut-down node.
7. Monitor the progress of startnoderescue by using the showtask CLI command. a. Look for the ID number of the most recent node_rescue task, which is usually at the bottom of the list. That task-ID will be used below.
Service Processor-to-Node Rescue CAUTION: Before proceeding with the controller node rescue, verify with the system administrator before disconnecting all host cables or shutting down the host. NOTE: This SPMAINT node-rescue procedure should only be used if all nodes in the 3PAR system are down and needs to be rebuilt from the HP 3PAR OS image on Service Processor. The SP-to-node rescue procedure is supported with HP 3PAR OS version 3.1.2 or higher and HP 3PAR Service Processor 4.2 or higher.
d. Choose 1 ==> Configure Node Rescue, then select the desired system. At this point, you will be prompted for the node rescue configuration information. 1. Verify the current HP 3PAR OS level and enter y to use the level. 2. Enter y to continue to setup node rescue. NOTE: 3. 4. 5. 5. The process may take a few minutes. Press Enter to accept the default [/dev/tpddev/vvb/0]. Enter y to specify the time zone. Continue to follow the time zone setup prompts.
8. Press CTRL+W to establish a whack> prompt. a. Type nemoe cmd unset node_rescue_needed and press Enter. The output will display the message no output. b. Type boot rescue and press Enter. c. Monitor the console output process. The node will continue to run POST then it will stop and display instructions for running node-rescue (see output on the following page). Enter y to continue. NOTE: If y is not entered, you will need to redo step 8. The system installs the OS.
17. Execute the shownode command to verify that all nodes have joined the cluster. cli% shownode Control Data Cache Node --Name--- -State- Master InCluster ---LED--- Mem(MB) Mem(MB) Available(%) 0 1000163-0 OK No Yes GreenBlnk 4096 6144 100 1 1000163-1 OK Yes Yes GreenBlnk 4096 6144 100 18. Execute the shutdownsys reboot command and enter yes to reboot the system. When the system reboot is complete, reestablish an SPMAINT session to perform additional CLI commands. 19.
E Controller Node to Drive Chassis Cabling This appendix described standard and split mode node to drive cage cabling for two and four node systems. For information about node numbering and drive cage numbering, see Chapter 2 (page 23). For information about PCI cards, their installation order, and their usage, see Appendix F (page 210). CAUTION: Do not use patch panels for connecting controller node(s) and drive chassis.
Figure 120 Standard Node to Drive Cage Cabling (4 Node System) NOTE: “Standard Node to Drive Cage Cabling (4 Node System)” (page 209) represents a logical relationship. In practice, the node pair physically lowest in the cabinet is connected to the physically lowest drive cages.
F Fibre Channel Adapter Installation Order This appendix describes the Fibre Channel adapter installation order for T-Class storage system controller node hardware upgrades. Use this appendix to determine which PCI slots to use for installing additional Fibre Channel, iSCSI, and Ethernet adapters. Three types of adapters are used in a T-Class system: • Fibre Channel adapters.
Table 31 Adapter Installation Order and Usage Based on Controller Node Type Usage (Adapter Type) Installation Order by PCI Slot Drive chassis connections (Fibre Channel adapters) 0, 2, 4 Hosts connections (Fibre Channel adapters, iSCSI adapters) 5, 3, 1, 41 Remote Copy (Ethernet and Fibre Channel adapters) 1 4,3 If not used for host connection or Remote Copy connection.
Table 32 Fibre Channel Adapter Installation Order Adapters Connection Types 2 1 drive cage Configuration Diagram 1 host 3 1 drive cage 2 host 2 drive cage 1 host 4 1 drive cage 3 host 2 drive cage 2 host 3 drive cage 1 host 5 2 drive cage 3 host 3 drive cage 2 host 1 drive cage 4 host 6 3 drive cage 3 host 2 drive cage 4 host There are three internal PCI busses in each controller node.
Figure 122 PCI Bus/PCI Slot Association Node Connection Matrix 213
G Storage System Sparing Schedule This appendix provides information on choosing the necessary sparing options when setting up your T-Class Storage System. • To view your systems current sparing algorithm settings, issue the showsys -paramcommand. • To set up or modify your systems sparing algorithm, issue the setsys SparingAlgorithm command, where is an option listed in “Options for CLI command ” (page 214).
active VLUN The connection of a virtual volume and a LUN for a particular host on a particular port. An active VLUN is created when a VLUN template is applied to the current system state. See also VLUN template. admin space See snapshot administration space. admin volume The base volume that is used by the system to store administration data such as the system event log. The admin volume is created as part of the storage system installation and setup process.
controller node chassis An enclosure that houses all the controller nodes of a storage system. copy space See snapshot data space copy-on-write A technique for preserving data by making a copy of it before executing a command that would overwrite it. copy-on-write snapshot A snapshot of a virtual volume made with the copy-on-write technique. Consists of a pointer to the source volume and a record of every change made to the source volume since the snapshot was created.
Fibre Channel adapter A Fibre Channel PCI host bus adapter (HBA) located in a controller node. The Fibre Channel adapter connects a controller node to a host or to a drive chassis. host A set of WWNs of the physical ports on a system. host definition The name of the host plus a list of the WWNs that make up the host. host port See target. host-sees VLUN template A rule that allows a particular host connected to any port to see a virtual volume as a specified LUN.
owner, owner node See logical disk owner node. parent volume A virtual volume from which a child volume (virtual or physical copy) is made. parent-child relationship The relationship between two virtual volumes in which the parent volume contains information needed to reconstruct the child volume. parity set See RAID 5 set. parity set position The group of chunklets that occupy the same position within a RAID 5 logical disk parity set.
secondary system A storage system to which virtual volumes are copied to during a remote copy operation. See also HP 3PAR Remote Copy, remote copy, and primary system. service processor A device inserted into a rack that enables HP Customer Satisfaction personnel to locally and remotely monitor and service storage system. set A grouping of mirrored or parity-protected chunklets. set size The number of chunklets in a set. Also known as mirror depth for RAID 1 sets and parity set for RAID 5 sets.
VLUN template A rule that sets up the association between the name of the virtual volume and a LUN-host, LUN-port, or LUN-host-port combination. The three types of VLUN templates are host-sees, port-presents, and matched-set. See also active VLUN and LUN. World-Wide Name (WWN) A unique 64-bit value used to identify Fibre channel devices on an arbitrated loop. The WWN consists of a prefix issued by the IEEE to uniquely identify the company and a suffix that is issued by the company.
Index B battery replacement notices, 185 C Canadian notice, 178 conventions text symbols, 174 D Declaration of Conformity, 178 Disposal of waste equipment, European Union, 180 documentation providing feedback on, 175 E European Union notice, 178 F Federal Communications Commission notice, 177 J Japanese notices, 179 K Korean notices, 179 R recycling notices, 180 regulatory compliance Canadian notice, 178 European Union notice, 178 identification numbers, 177 Japanese notices, 179 Korean notices, 179