HP PCIe IO Accelerator for ProLiant Servers User Guide, v1.2.
Legal notices © Copyright 2010 Hewlett-Packard Development Company, L.P. Confidential computer software. Valid license from HP required for possession, use or copying. Consistent with FAR 12.211 and 12.212, Commercial Computer Software, Computer Software Documentation, and Technical Data for Commercial Items are licensed to the U.S. Government under vendor's standard commercial license. The information contained herein is subject to change without notice.
Contents HP PCIe IO Accelerator for ProLiant Servers .............................................................................................. 1 User Guide, v1.2.7 for Windows............................................................................................................... 1 Introduction ........................................................................................................................................... 5 Overview.....................................................
fio-status ............................................................................................................................................... 37 fio-update-iodrive ................................................................................................................................... 39 Appendix D: SNMP Test Mode and MIB Support ..................................................................................... 40 Introduction ......................................................
Introduction Overview Congratulations on your purchase of an HP solid state storage device. This guide explains how to install, troubleshoot and maintain your PCIe IO Accelerator or PCIe IO Accelerator Duo. NOTE: Throughout this manual, when you see a reference to a PCIe IO Accelerator, you may substitute your device if you are using a different product from the PCIe IO Accelerator line (such as an PCIe IO Accelerator Duo).
Microsoft Windows 2008 Server 64-Bit, R1 (with SP2 or higher) Microsoft Windows 2008 Server 64-Bit, R2 NOTE: All operating systems must be 64-bit architecture to support the PCIe IO Accelerator. Running the latest Service Pack of a release is strongly recommended. Hardware Requirements The PCIe IO Accelerator requires at least: An open PCI-Express slot. The PCIe IO Accelerator requires a minimum of a half-length, half- height slot with an x4 physical connector.
Package List In the Box Your PCIe IO Accelerator comes with these items: PCIe IO Accelerator Solid State Storage Device ioLaunch USB Key HP PCIe IO Accelerator for ProLiant Servers installation instructions PCIe IO Accelerator half-height bracket (used on low-profile systems) On the USB Key are the following items: PCIe PCIe PCIe PCIe IO IO IO IO Accelerator Accelerator Accelerator Accelerator User Guide for Linux User Guide for Windows End-user License Agreement Management Tool User
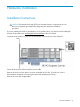
Hardware Installation Installation Instructions CAUTION: Electrostatic discharge (ESD) can damage electronic components. Be sure that you are properly grounded before beginning any hardware installation procedure. If you are installing the PCIe IO Accelerator in a low-profile system, you need to use the half-height bracket. Please refer to the Half-Height Bracket Installation section for details. Locate the serial number on your PCIe IO Accelerator and record it for future reference.
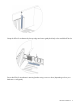
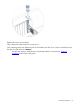
Grasp the PCIe IO Accelerator by the top edge and seat it gently but firmly in the available PCIe slot: Secure the PCIe IO Accelerator’s retaining bracket using a screw or lever (depending on how your hardware is configured): Hardware Installation 9
Replace the server’s access panel. Plug in the power cable and power on the server. Your operating system may detect the PCIe IO Accelerator and ask if you want it to install a driver for the device. In that case, click Cancel. You are now ready to install the driver and utilities software. Proceed to the Software Installation section later in this guide.
Half-Height Bracket Installation (PCIe IO Accelerator only) NOTE: The PCIe IO Accelerator Duo is not compatible with a half-height bracket. For half-height installation (such as in low-profile systems), you need to replace the fullheight retaining bracket with the included half-height bracket. CAUTION: Electrostatic discharge (ESD) can damage electronic components. Be sure you are properly grounded before starting any hardware installation procedure. 1.
3. Remove the bracket carefully from the device. 4. Align the LEDs on the PCIe IO Accelerator with the holes in the half-height bracket. NOTE: Be sure the bracket tabs are on the heat sink side of the device. 5. Attach the half-height bracket using a Philips #1 tip screwdriver to tighten the two screws.
CAUTION: Do not over-tighten! This can cause damage to the device.
Software Installation New Installation To install the PCIe IO Accelerator software on a new system, make sure you have completed the steps under Hardware Installation. 1. Log in to your server as Administrator or have Administrator rights. 2. Download the Windows PCIe IO Accelerator installation program from http://www.hp.com/support to your desktop or a convenient directory. 3. Run the PCIe IO Accelerator installation program (Setup Wizard) as explained below. Using the Setup Wizard 1.
3. If you have a previous version of the IO Accelerator software installed, follow the directions on the screen to uninstall it; otherwise, click Next. 4. Click Next on the Select Installation Folder screen if you want to use the default installation location (C:\Program Files\HP StorageWorks IO Accelerator\). If you want to change the default location, click Browse and navigate to the folder you want, and then click Next.
5. On the Custom Setup screen, click Next if you want to use the default program features for the installation. Or, if you want to customize the features, click the plus sign next to Driver and Utilities or IO Management Utilities and select each customization you want from the feature’s drop-down list.
NOTE: Be careful changing the default features; doing so may affect the performance or functionality of the IO Accelerator software. 6. On the Configure Shortcuts screen, click Next to accept the default program shortcuts; otherwise, clear any options you do not want and then click Next. 7. On the Ready to Install screen, click Install to begin the installation. A progress bar indicates the installation progress.
8. On the Completion screen, click Finish to exit the Wizard and launch the IO Accelerator software. NOTE: If you are prompted to stop and start the Microsoft SNMP service at some point during the software installation, do so. To summarize, the installation program: Creates a folder for the PCIe IO Accelerator software components (the default path is C:\Program Files\ HP StorageWorks IO Accelerator\). Installs and load the PCIe IO Accelerator Windows driver. (This may require a reboot.
Existing PCIe IO Accelerator Installation To install the latest PCIe IO Accelerator Windows software on an existing installation, complete the steps under Hardware Installation if you also installed a new PCIe IO Accelerator to the existing installation. Review the Release Notes document available for this version of the software for additional steps that may be needed to complete the install. Log in as Administrator or have Administrator rights. Uninstall the existing driver, utilities, etc.
PCIe IO Accelerator Naming The PCIe IO Accelerator receives a name and number as part of the install process for identification. The syntax is fctx, where x is the number of the PCIe bus where you installed the PCIe IO Accelerator. Use PCIe IO Accelerator Management Tool to view this bus number, or follow these steps: 1. Select Start > Control Panel. 2. Click Administrative Tools. 3. Click Computer Management. 4. Device Manager. 5.
5. Locate and right-click the PCIe IO Accelerator in the list of storage devices on the right. (If the PCIe IO Accelerator does not appear in the list, choose Rescan Disks from the Action menu. You may also need to restart your server to display the PCIe IO Accelerator in the list.) 6. Click Initialize Disk. You can now use the Disk Management Utility to add a file system to your PCIe IO Accelerator. Creating a RAID Configuration You can use your PCIe IO Accelerator as part of a RAID configuration.
Maintenance The PCIe IO Accelerator includes both software utilities for maintaining the device as well as external LED indicators to display its status. You can also install SNMP as a monitoring option. PCIe IO Accelerator LED Indicators The PCIe IO Accelerator includes three LEDs showing device activity or error conditions. SNMP Support The PCIe IO Accelerator Windows Setup program provides the option to install support for SNMP.
the Windows SNMP Service to recognize the PCIe IO Accelerator's agent. If you did not choose to install the SNMP support at Setup, and want to do so later, rerun the Setup program. Choose to install only the SNMP support from the list of items. Once the Setup program completes the install, it will stop and restart the Windows SNMP Service. For details on using SNMP Test Mode, see Appendix D: SNMP Test Mode and MIB Support.
Uninstalling the PCIe IO Accelerator Windows Driver To uninstall the PCIe IO Accelerator Windows driver, Examples (Windows 2003): 1. Go to Start > Control Panel. 2. Click Administrative Tools. 3. Click Computer Management. 4. Click Device Manager in the console tree at the left. 5. Expand the HP StorageWorks IO Accelerator Devices item. 6. Right-click the desired PCIe IO Accelerator. 7. Click Uninstall. Windows uninstalls the driver.
Upgrading the PCIe IO Accelerator Firmware CAUTION: You should upgrade the firmware only if the System Event Log reports out-of-date firmware, or if instructed to do so by HP Customer Support or the Release Notes and Errata document. Viewing the Firmware Version The firmware version can be found in the Windows Event Log. It is reported by the PCIe IO Accelerator Management Tool and the fio-status command-line utility.
the operation. 4. Type the following command at the command prompt: fio-update-iodrive iodrive_version.fff -d /dev/fct# (where is the location of the PCIe IO Accelerator firmware--the default is C:\Program Files\HP StorageWorks IO Accelerator\Firmware. The version is the numerical version of the driver (higher is newer.) The -d /dev/fct# identifies the PCIe IO Accelerator to update, where # is its PCIe bus number. (Use fio-status at a command prompt to view this number.) 5.
2. Double-click the autoattachdisable.reg file. If necessary, confirm that you want to modify the registry. 3. This creates a new DWORD parameter registry key called AutoAttach in: HKEY_LOCAL_MACHINE\SYSTEM\CurrentControlSet\Services\fiodrive\Parameters 4. Your PCIe IO Accelerator now will not automatically attach the next time you reboot the server.
Appendix A: Troubleshooting Event Log Messages The Windows System Event Log displays fiodrive messages concerning the PCIe IO Accelerator—both Informational and Warnings. NOTE: Each PCIe IO Accelerator is numbered from 0 upwards. These numbers reflect the PCIe bus number where you installed the device. Use ioAdministrator to view this number for your device. To open the Windows Event Viewer, Examples (Windows 2003): 1. Click Start. 2. Right-click My Computer and choose Manage from the drop-down list. 3.
occurs at boot time.) As part of this attach process, the PCIe IO Accelerator driver checks to see if there is an AutoAttach parameter in the Windows registry. If you create this Registry parameter to disable auto-attach, the attach operation does not complete. To attach an unattached PCIe IO Accelerator, 1. Run the HP PCIe IO Accelerator Management Tool. Select your unattached PCIe IO Accelerator from the Device Tree. Click Attach. Confirm the Attach operation.
Appendix B: Manual Installation The Windows Setup program should install your needed driver and software. However, if the driver does not install, you can perform a manual install (or upgrade) using the steps below. Manual Installation on Windows Server 2003 The Windows Driver Wizard automatically detects the new PCIe IO Accelerator and start to locate its driver after you restart the system. First, Windows asks you to locate the software driver: 1.
If you need to update your firmware, proceed to either of the two sections later in this guide that discuss performing an outdated firmware check. Manual Installation on Windows Server 2008 The Windows Driver Wizard automatically detects the new PCIe IO Accelerator and starts to locate its driver after you restart the system. First, Windows ask you to locate the software driver. 1. Click Browse next to the path field. Windows displays a file dialog.
2. Select the folder with the PCIe IO Accelerator driver (the default is C:\Program Files\HP StorageWorks IO Accelerator\1.2.7.1\Drivers). 3. Click OK. 4. Click Next. 5. Windows finds the correct driver and installs the device software. When the driver install completes, 6. Restart the server. 7. Proceed to the Outdated Firmware Check section to continue.
Appendix C: Utilities Reference The Windows Setup package installs various utilities into the C:\Program Files\HP StorageWorks IO Accelerator\Utils folder, described in the table below.
NOTE: In most cases, the PCIe IO Accelerator driver automatically attaches the device on load. You only need to run fio-attach if you ran fio-detach or if you set the PCIe IO Accelerator’s auto_attach parameter to 0. Syntax fio-attach [-q, -h, -v] where is the name given by the PCIe IO Accelerator driver to your device. This name is /dev/fctx, where x indicates the PCIe bus number where you installed the PCIe IO Accelerator.
fio-detach Description Detaches the PCIe IO Accelerator and removes the corresponding fctx PCIe IO Accelerator block device from the OS. The fio-detach utility waits until the device completes all read/write activity before executing the detach operation. The command also displays a progress bar and percentage as it completes the process. NOTE: Before using this utility, ensure that the device you want to detach is not currently mounted and in use.
fio-format [-q, -s , -u, -h, -v] where is the name given by the PCIe IO Accelerator driver to your device. This name is /dev/fctx, where x indicates the device number. (The number reflects the PCIe bus for the PCIe IO Accelerator.) For example, the name /dev/fct4 refers to the PCIe IO Accelerator installed in PCIe Bus 4 in your system. (Use fio-status to view this number.) Options -q Quit on erase error.
-f Scan every device in the system -i Print the device serial number. -r Force the link to retrain -v Verbose: Print extra data about the hardware. -y "Yes" is forced when user is asked to continue. fio-status Description Provides detailed information about the PCIe IO Accelerator board(s) installed. This utility operates on either fctx or fiox devices. The utility depends on running as root and having the driver loaded. If no driver is loaded, a smaller set of status information is returned.
Internal temperature (avg. and max., since driver load) in degrees Centigrade Board temperature, in degrees Centigrade Internal voltage, avg. and max. Auxiliary voltage:, avg. and max.
fio-update-iodrive Description Updates the PCIe IO Accelerator’s firmware. This utility scans the PCIe bus for all PCIe IO Accelerators and updates them. A progress bar and percentage are shown for each drive as the update continues. To update one or more specific drives, use the -d option with the device number (shown in fio-status) if the driver is loaded or the -s option along with the PCIe bus address (viewed using lspci) if the driver is unloaded, to identify the device(s).
Appendix D: SNMP Test Mode and MIB Support Introduction This document explains how you can set up a test mode with your PCIe IO Accelerator’s Windows SNMP agent. This enables you to set test values in a indows registry and force SNMP traps without having to create the actual conditions on the device. For example, you can use the SNMP test mode to change the non-writeable indicator and generate a trap, or simulate a change to the physical or logical size of the device, etc.
NOTE: All entries, except those marked by **, reflect your registry changes immediately. Entries marked by ** require a restart of the Windows SNMP agent for the changes to take effect.
Celsius. If this value is set above 78 degrees Celsius for ioDimm cards, a trap is generated. If set above 90 degrees for HP Mezzanine cards, a trap is generated.
**updateDelay Number of milliseconds to wait until getting the next value from the driver to generate a trap SNMP MIB Support The following SNMP MIB fields are supported in Windows: ioDrvMibRevMajor ioDrvMibRevMinor ioDrvMibCondition ioDrvInfoIndex ioDrvInfoStatus ioDrvInfoName ioDrvInfoSerialNumber ioDrvInfoPartNumber ioDrvInfoSubvendorPartNumber ioDrvInfoSparesPartNumber ioDrvInfoAssemblyNumber ioDrvInfoFirmwareVersion ioDrvInfoDriverVersion ioDrvInfoUID ioDrvInfoState ioDrvInfoClientDev
Appendix D: SNMP Test Mode and MIB Support 44
Hewlett-Packard Customer Support Please address all support inquiries to: http://www.hp.