
MSM7xx Controllers Configuration Guide v6.4.0


NOTE: If a user’s account is configured for public IP address support and there is no free public
IP address in the pool when the user tries to login, the login is refused.
Assigning public IP addresses to users
To obtain a public IP address, a user’s account must have its Public IP address option enabled. Do
this as follows:
• If using the local user accounts option (defined on the Controller >> Users menu), enable the
Public IP address option in the account profile or subscription plan that is assigned to the user.
See “Defining account profiles” (page 357) and “Defining subscription plans” (page 358).
• If using Active Directory, enable the Public IP address option in the account profile (see
“Defining account profiles” (page 357)) that is assigned to an Active Directory group. To set
up an Active Directory group, see “Configuring an Active Directory group” (page 371).
• If using a RADIUS server, add the following Colubris AV-Pair value to the users account:
use-public-ip-subnet=1. For more information, see “Default user public IP address”
(page 475) and “Default user public IP address” (page 475).
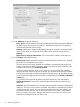
DHCP server lease time
Use this setting to define the amount of time the public IP address lease will be valid. This setting
only applies to public IP addresses. It overrides the DHCP lease time set by selecting Controller >>
Network > Address allocation > DHCP server.
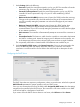
Address pool
The address pool contains all the public IP addresses that can be assigned to users. You can define
up to 30 addresses.
Addresses must be valid for the network to which the Internet port is connected. Specify a single
address or an address range as follows: address1 - address2. For example, the following defines
a range of 20 addresses: 192.168.1.1-192.168.1.20
Configuring the DHCP relay agent
The controller provides a flexible DHCP relay implementation. It can listen for requests on the LAN
port or client data tunnel and forward them to a DHCP via any of the controllers physical or logical
interfaces.
For additional flexibility, separate DHCP relay agents can be enabled on access-controlled VSCs.
See “DHCP relay agent” (page 135).
NOTE: DHCP relay is not supported on the Internet port when it is operating as a PPPoE client
or if the firewall is set to High and NAT is enabled. This is because DHCP server must be able to
ping the assigned address to prevent duplicate assignments.
IMPORTANT: You must define routes on the DHCP server, so that the DHCP server can successfully
send DHCP response packets back to the DHCP relay agent on the controller. These should be
static and persistent host routes that identify the IP address assigned to the controller LAN port or
additional VSC relay IP address, (i.e. 192.168.1.1). On Windows, such a static route would look
like this:
route add 192.168.1.1 mask 255.255.255.255 10.10.10.22 metric 1 p
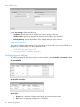
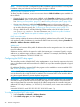
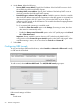
To configure the global DHCP relay agent
1. Select Controller >> Network > Address allocation.
2. Select DHCP relay agent, and then Configure.
48 Network configuration