
MSM7xx Controllers Configuration Guide v6.4.0
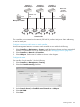
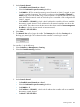

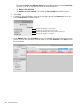

3. Under Connectivity:
• Set Communicate using to Port 1.
• Set VLAN ID to 5. This creates the teaming control channel on VLAN 5, tagged, on port
1 on the controller. (Important: This VLAN is not shown on the Controller > Network >
VLANs page, and is not created using a network profile. It is explicitly defined here only.)
Make sure that the network switch to which this port is connected is also configured with
VLAN 5, tagged.
• Set IP address to 192.168.5.2, which is the IP address this controller will use to establish
the teaming control channel. The IP addresses for all teamed controllers must be on the
same subnet. This subnet cannot be the same as the subnet used for Team IP address, or
for the Access network or Internet network.
• Set Mask to 255.255.255.0.
4. Select Save.
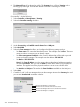
5. The Network Tree will no longer be visible. The Summary box will show Teaming with a
blinking gray status light. This indicates that the controller is searching for a team.
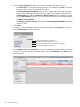
On controller 1, do the following:
1. Select Controller >> Management > Teaming.
2. Select the Controller teaming checkbox.
3. Under Connectivity:
• Set Communicate using to Port 1.
• Set VLAN ID to 5.
• Set IP address to 192.168.5.1, which is the IP address this controller will use to establish
the teaming control channel.
• Set Mask to 255.255.255.0.
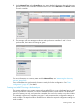
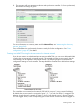
4. Select the Team manager checkbox, and configure the following settings under it:
• Set Team name to a name that identifies the team. This example uses Team 1. The team
name provides a convenient way to identify a team.
• Set Team IP address to the virtual IP address that will be used to provide access to the
management tool on the team manager. This example uses the address 192.168.1.200.
Creating a team 259