
MSM7xx Controllers Configuration Guide v6.4.0


• Wireless mode: Select the wireless mode that will be used for the local mesh.
• Antenna selection: Select the antenna(s) on which the radio transmits and receives.
Internal: The internal antenna is used to transmit and receive.◦
◦ External: The external antenna is used to transmit and receive.
NOTE: All APs must all be configured for the same country so that the local mesh established
respects local RF regulations. To define the country setting, see “Assigning country settings to a
group” (page 170).
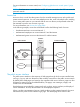
The local mesh provisioning profile for AP 2 needs to be set to alternate master mode so that it
can support a connection from AP 1. Select AP 2 in the Network Tree and then open the
Configuration > Local mesh page and select Local mesh provisioning profile.
NOTE: To enable the controller to send provisioned settings to controlled APs, activate the Enable
provisioning of controlled APs option on the Controller >> Controlled APs > Provisioning page.
Until this option is enabled, provisioned settings defined on the controller are not sent to any
controlled APs.
Once provisioning settings have been defined you need to update all controlled APs with the new
settings by synchronizing them as described in “Synchronizing APs” (page 164).
After an AP has been updated with provisioned settings, the provisioned settings do not become
active until the AP is restarted, or a Remove and Rediscover action is executed on the Controlled
APs >> Configured APs page.
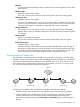
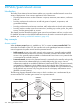
Sample local mesh deployments
RF extension
Local mesh provides an effective solution for extending wireless coverage in situations where it is
impractical or expensive to run cabling to an AP.
In this scenario, a wireless bridge is used to extend coverage of the wireless network. Both APs
are equipped with omni-directional antennas, enabling them to deliver both AP capabilities and
wireless bridging using local mesh capabilities.
Sample local mesh deployments 393