
MSM7xx Controllers Configuration Guide v6.4.0

Examples of returned HTML code
The following examples show the actual HTML code returned file for various authentication
conditions.
User was successfully authenticated by the RADIUS server
<HTML>
status=success
welcome-url=https://206.162.167.226:8888/cebit-php/
welcome.php?site=www.noc-controller.com&user=user00&wantedurl=&nasipaddress=&nasid=L003-00069
session-url=http://192.168.1.1:8080/session.asp
</HTML>
Users IP address is already in use by an active session
<HTML>
status=already-logged-in
</HTML>
User authentication was refused by the RADIUS server
This could be due to an unknown username, or invalid username or password.
<HTML>
status=failure
external-err-msg=Your login was refused.
login-err-url=https://206.162.167.226:8888/cebit-php/login-error.php?site=john-cn3000&user=user12&
nasipaddress=
</HTML>
User could not be authenticated
The controller could not contact a RADIUS server.
<HTML>
status=failure
external-err-msg=You cannot be logged in at this time. Please try again later.
login-err-url=https://206.162.167.226:8888/cebit-php/login-error.php?site=john
-cn3000&user=user12&nasipaddress=
</HTML>
Simple NOC authentication example
This is a simple example showing how to use the NOC authentication feature.
1. Retrieve the Public Access Examples zip file at www.hp.com/networking/
public-access-examples.
2. Create the following folder on your Web sever: newlogin.
3. Copy these files from the Public Access Examples zip file into the newlogin folder:
• login.html
• transport.html
• session.html
• fail.html
• logo.gif
4. Customize login.html to accept username and password information from users and then
send it to the controller. You could use code similar to the following PHP example to send
login information back to the controller for authentication:
https://controller_ip:8090/goform/HtmlNocLoginRequest?username=username&password=password&ipaddress=user_ip
The variable loginurl contains the URL on the controller where user information is sent for
authentication.
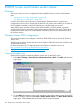
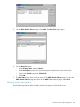
5. Start the management tool.
6. Select Public access > Web server.
7. Enable the NOC-based authentication feature.
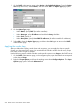
8. Under Security add the IP address of the Web server to the Allowed Addresses box.
9. Under Active interfaces make sure that the interface on which the request will be received is
enabled.
10. Select Save.
556 NOC authentication