HP StorageWorks Enterprise Virtual Array Updating Product Software Guide (XCS 09534000) Abstract This guide describes how to upgrade controller software, disk drive firmware, and related EVA management software on the HP StorageWorks 4400 Enterprise Virtual Array and HP StorageWorks 6400/8400 Enterprise Virtual Array models. This guide is intended for field personnel and customers who are experienced with Enterprise Virtual Arrays, storage area networks, and HP StorageWorks Command View EVA.
Legal and notice information © Copyright 2010 Hewlett-Packard Development Company, L.P. The information contained herein is subject to change without notice. The only warranties for HP products and services are set forth in the express warranty statements accompanying such products and services. Nothing herein should be construed as constituting an additional warranty. HP shall not be liable for technical or editorial errors or omissions contained herein.
Contents 1 Getting started .................................................................................. 9 Upgrade overview ...................................................................................................................... 9 Upgrade paths ........................................................................................................................... 9 Reference documentation ..................................................................................................
Upgrading the management module ........................................................................................... Verifying the installation on the management module .............................................................. Upgrading browsers and JREs .................................................................................................... HP Insight Remote Support software ............................................................................................
Documentation feedback ..................................................................................................... Related information ................................................................................................................... Documents ........................................................................................................................ Websites ...............................................................................................................
Figures 1 EVA Storage Network Properties window ................................................................... 15 2 HP Command View EVA online help ......................................................................... 15 3 Hardware Folder Properties window .......................................................................... 16 4 Checking operational state ....................................................................................... 16 5 Sample SAN Visibility report .................
33 Bad image header (Status code 65) ..........................................................................
Tables 1 Reference documentation ......................................................................................... 10 2 Management software version worksheet ................................................................... 14 3 HP Command View EVAPerf virtual disk statistics ......................................................... 30 4 IBM AIX timeout settings .......................................................................................... 32 5 Pre-upgrade task checklist ..............
1 Getting started This chapter provides information about required kits and reference documentation. Before you perform the upgrade procedures, ensure that your system meets the requirements. Upgrade overview Depending on the upgrade path for your configuration, you can perform an upgrade either online or offline. Online upgrade EVA controller software is upgraded while the controllers are processing I/O. The controllers resynchronize simultaneously while hosts and applications continue to run.
Reference documentation Table 1 on page 10 identifies the documentation you should have available when upgrading the storage system. Table 1 Reference documentation Document Required Location HP StorageWorks EVA documentation HP StorageWorks 4400 Enterprise Virtual Array User Guide No http://www.hp.
Required kits Before you begin the Enterprise Virtual Array upgrade, you must download the XCS 09534000 controller software from the following website: http://www.software.hp.com/ Click Storage and NAS under Product category, scroll down to HP EVA4400/6400/8400 XCS 09534000, and click Receive for Free. Follow the instructions to enter your information and download the .ISO image. You must also obtain a supported version of HP Command View EVA.
3. Link your support agreement(s) to your ITRC user ID: NOTE: If you have previously linked your support agreements, skip this step and continue with Step 4. To learn more about why you need to link your Service Agreement ID or System Handles(s) to your user ID on the IT Resource Center and the information you will need to link a support agreement, go to: http://www.itrc.hp.com/service/help/aboutSupportAgreementLinking.do. • Go to http://www.itrc.hp.com/service/entitlements/linkSupportAgreement.do.
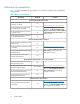
2 Preparing for the upgrade Before starting the XCS upgrade, you should perform several tasks to minimize the time required to complete the upgrade. The tasks you perform depend on your system configuration and the HP Command View EVA implementation. These tasks focus on upgrading system components to ensure they meet the supported configuration for XCS 09534000. Table 5 on page 46 provides a checklist so you can track your progress as you perform these pre-upgrade tasks.
NOTE: For details on EVA software compatibility, see Table 1.0, the EVA software version compatibility table and Table 2.0, the HP Command View EVA interoperability support table, in the HP StorageWorks Enterprise Virtual Array Compatibility Reference. See “Required documentation” on page 10 for the link to this document. Table 2 Management software version worksheet Software Current version Required version (minimum) Locating version information1 Upgrade procedure HP Command View EVA (required) 9.
1. Open HP Command View EVA on the management server or the management module, if applicable. (This procedure is for server-based management.) The EVA Storage Network Properties window (Figure 1 on page 15) opens. Figure 1 EVA Storage Network Properties window . 2. Click Help in the Session pane. The full version number is displayed at the top of the online help window (Figure 2 on page 15). If the version is earlier than the minimum supported version, it must be upgraded.
1. Open HP Command View EVA and click the icon of the storage system you want to upgrade. a. Examine the Hardware folder in the navigation pane to see if there are any hardware caution or warning conditions. If there are any hardware caution or warning conditions, click the Hardware folder to expand it. The Hardware Folder Properties window opens (Figure 3 on page 16). The Operational State field indicates if there is a hardware problem. Figure 3 Hardware Folder Properties window . b.
2. Replace any hardware components that have failed. NOTE: To replace any components, see the user guide for your array model for information about replacement. See Table 1 on page 10 for links to these guides. TIP: If there is a yellow attention icon, you may still be able to do the upgrade, for example, when leveling is occurring. If any unusual icons are visible, check with your HP-authorized service representative before doing the upgrade.
Collecting SAN configuration data using SAN Visibility IMPORTANT: SAN Visibility is only available for server-based management. HP provides the SAN Visibility tool to automate the process of collecting SAN configuration data. SAN Visibility collects configuration information from the Fibre Channel switches on your SAN. Any information provided by devices when they log into the fabric is included.
3. Select SAN Settings and enter the following information: a. Enter a name in SAN Name. You can use the default SAN Name, but HP recommends that you change it to a name that is meaningful to you. This name is used when generating reports, so it should be one that is easily recognized as being associated with the SAN on which data collection will be done.
4. 20 Click Switch Settings and enter the following information: a. Enter the IP Address of the primary switch for the SAN for which you want a report. Information will be collected for all devices connected to this switch. b. Clear Discover cascaded switches. This option automatically detects all switches connected to the switch identified by the IP address. Including all the cascaded switches increases the data collected for the report to include all the devices connected to all the switches.
5. Select Customer Details and enter the following information: a. Enter your name in Name. This information is required. b. Enter your e-mail address in E-Mail to receive the completed report. This information is required. It is not necessary to have an e-mail address connected to the EVA controller. You should enter the e-mail address where you typically receive e-mail. You can enter multiple email addresses in E-Mail by separating entries with a semicolon (;). c.
dropdown list. If you have external e-mail access from your environment, this is the preferred method. • Manually—Requires you to send your data manually to HP to obtain a SAN Visibility report. If you do not have external e-mail access, use this method. Creating a report automatically 1. Click Data Collection. 2. Select the fabric for which you want to create a report from the Choose switch group for data collection. Check Collect data for all switch groups to create reports for all the fabrics. 3.
Creating a report manually To obtain the SMTP server for the e-mail address you entered on the Customer Details window, select the Automatically e-mail the collected raw data on completion checkbox. If SAN Visibility does not find the SMTP server or if you want to create a report manually, follow the procedure below. 1. Click Data Collection. 2. Select the fabric for which you want to create a report from Choose switch group for data collection.
Reading the report 1. Save the attached file (.hppr file) to a preferred location. Do not change the file extension. 2. Double-click the saved file to extract the processed report. The processed report is extracted and stored at: \ExtractedProcessReports\\. 3. Click on the .hppr file to open the report in your browser. 4. In the left navigation pane, click High Level Fabric Summary. The High Level Fabric Summary window opens (Figure 5).
Evaluating your configuration The following factors can affect the success of an online upgrade. Consider these factors when determining if an online upgrade is appropriate for your environment. • Queuing host I/O—After the upgrade, the array performs a resynchronization. During the resynchronization, host I/O is queued to the host, which can create a backlog of requests for processing when the array is able to respond.
NOTE: In the formula, (allocated capacity) is the total of all virtual disks, snapshots, snapclones, mirrorclones, and containers. (allocated capacity) + (15 * DR log allocated capacity) + (14 TB * number of DR groups) If the result is less than the allocated capacity values cited for the number of virtual disks you have, an online upgrade is supported. If it is more than the values cited, you must do an offline upgrade.
NOTE: When determining an appropriate time to do an online upgrade, ensure that no configuration-related replication tasks (creating or deleting DR groups, snapshots, snapclones, mirrorclones or presenting to hosts) are being performed. Analyzing storage system I/O using HP Command View EVAPerf The HP Command View EVAPerf tool included with HP Command View EVA can be used to gather and analyze statistics on storage system utilization.
HP Command View EVAPerf command options The following options are used with the HP Command View EVAPerf commands: • -csv: Use comma separated output. This format is useful for importing large amounts of data into a spreadsheet for analysis. • -cont n: Runs the command continuously at an interval specified by n. The default interval is one second. • -dur n: Specifies the duration of a continuous mode session.
Identifying virtual disk activity If you cannot locate a period that meets the necessary I/O load requirements, it may be possible to identify specific applications that are imposing heavy I/O loads, and suspend them long enough to perform the upgrade. This can be done by using HP Command View EVAPerf to view virtual disk activity. For example, after running HP Command View EVAPerf, you determine that all the virtual disks on the storage system are nearly idle with the exception of one virtual disk.
Figure 7 Sample virtual disk statistics display . Table 3 HP Command View EVAPerf virtual disk statistics Counter Description Read Hit Req/s The number of read requests per second completed from the array cache memory. Data may reside in the cache memory due to a previous cache miss or because of a prefetch operation generated by a sequential read data stream. Read Hit MB/s The rate at which data is read from the array cache memory because of read hit requests.
Counter Description Mirror Data Rate The rate at which data travels across the mirror port to complete read and write requests to a virtual disk. This data is not related to the physical disk mirroring for Vraid1 redundancy. Write data is always copied through the mirror port when cache mirroring is enabled for redundancy. In active/active controllers, this counter includes read data from the owning controller that must be returned to the requesting host through the proxy controller.
IBM AIX Checking or changing timeouts AIX requires the disk settings shown in Table 4 for the native multipath drives. Table 4 IBM AIX timeout settings Setting Value Description PR_key_value NA Sets the key value for persistent reservations. Persistent reservations are not supported. Algorithm fail_over Sets the load balancing algorithm to fail_over. All I/O uses a single path. The remaining paths are in standby mode. The value round_robin is not supported.
• • • • • login_retry_count = 30 failover = 0 load_balancing = 1 excludemodel = 0x0 auto_restore = 0xA0 Emulex Driver parameters (single path) • • • • HPELXLPFC=y nodev_timeout=60 qdepth=30 discovery_threads=1 Emulex Driver parameters (with Multipulse) • nodev_timeout=10 • qdepth=16 • discovery_threads=32 To check or set Linux parameters, use the set_parm executable found in the /opt/hp/ directory. When executed, the options to change timeout values are displayed.
• If you are in a VMware environment where you are running as a Windows guest, see “VMware” on page 35. Checking timeout values The key timeout setting in the registry at HKEY_LOCAL_MACHINE\SYSTEM\CurrentControlSet\ Services\Disk\TimeoutValue should be set to 3c (60 seconds), which is the Microsoft Windows default. If the registry entry does not exist, you must create it. See your Windows documentation for instructions.
set sd:sd_io_time = 60 set ssd:ssd_io_time = 60 For QLogic, edit the /kernel/drv/qla2300.conf file and change the hbax-link-down-timeout value to 60 as follows: hba0-link-down-timeout=60; For Emulex, edit the /kernel/drv/lpfc.conf file and change the linkdown-tmo value to 60 as follows: linkdown-tmo=60; VMware VMware ESX (Hypervisor) does not time I/O for a guest operating system. Thus the SCSI timeouts on commands issued by each VMware guest (Linux, Windows, Solaris) are those provided for these systems.
Managing application I/O timeouts for an online upgrade Applications are typically insulated from the online controller firmware upgrade by the operating system and HBA driver software. Consequently, if the application is running on a properly configured operating system, the online controller upgrades will be performed successfully. It may be necessary to determine if any applications have timeout requirements that are more stringent than those of the operating system.
Before beginning the upgrade, it is recommended that you perform a full verified backup of all storage system data. Although not required, it is always good practice to back up your data before performing major operations such as software upgrades. The backup should be scheduled as close to the upgrade process as possible. For more information about establishing and implementing good backup procedures for the EVA, contact your HP sales representative.
Upgrading on a management server This procedure is for the typical HP Command View EVA installation on a management server. To use the custom installation procedure, which provides control over which components are installed, see the HP StorageWorks Command View EVA Installation Guide for instructions. To install the complete software suite: 1. Close all applications running on the management server. 2. Insert the installation CD into the drive. 3. Browse to the installation CD. 4.
Verifying the installation on the management server To verify that the software was installed successfully: 1. Ensure that the software icons for HP Command View EVA , HP Command View EVAPerf and/or HP Storage System Scripting Utility appear on the desktop. 2. Run HP Command View EVA. 3. Verify the display of storage system resources in the interface. In the navigation pane, click Hardware and verify the following: • New, uninitialized arrays appear as uninitialized storage systems.
3. Open a browser and browse to the WOCP (Web-based Operator Control Panel): https://HP EVA storage system IP address:2373 NOTE: • If you are running a version of management module software earlier than 0001.1000 (which corresponds to XCS 09004000 or earlier), use port 2372. • If you have not previously set the IP address for the management module, the default is 192.168.0.1.
1. On the WOCP login window, log in as an HP EVA administrator (username admin and the password). NOTE: The password, if set before the upgrade, is maintained during the upgrade. 2. The WOCP GUI appears. Click View detailed system information and verify the Operation state, XCS version, and the management module software version. To verify that HP Command View EVA was upgraded successfully: 1.
24x7 to ensure maximum system availability by providing intelligent event diagnosis, and automatic, secure submission of hardware event notifications to HP, which will initiate a fast and accurate resolution, based on your product’s service level. Notifications may be sent to your authorized HP Channel Partner for on-site service, if configured and available in your country.
Monitoring storage system stability Estimated time to complete: 25–30 minutes When to perform: 48 hours before beginning the upgrade The storage system configuration should be stable for 48 hours before beginning the upgrade. Check the status of the array to ensure it is stable and then continue monitoring status until the upgrade begins. 1. Open HP Command View EVA and click the icon of the storage system you want to upgrade. 2.
3. Verify that no changes to the storage system configuration are in progress. For example, you should not be in the process of creating a virtual disk. Configuration changes should not be made within 48 hours before beginning the upgrade. Proactive event notification can be used to alert you if a critical event occurs during the 48 hours before the upgrade. NOTE: • The leveling process does not impact the upgrade. If leveling is in progress, the upgrade can be performed.
1. 2. Click the Data Replication folder in the navigation pane. Check the Connection State in the Data Replication Folder Properties window. • All EVA storage systems must be running normally with fully functional controller pairs.
TIP: When capturing the HP Command View EVA configuration, it is a best practice to specify the SAVE ALL option. This helps to capture critical data such as the WWN, useful for rebuilding the array configuration. NOTE: You cannot use the utility to restore a configuration that contains disk drives of different capacities. You must manually restore that type of configuration.
Task Task complete Checking and upgrading your SAN infrastructure, page 17 Time required: After collecting and evaluating data on your configuration over several weeks, you can determine when is an appropriate time to do the upgrade.
Preparing for the upgrade
3 Upgrading the Enterprise Virtual Array The following steps guide you through the process of upgrading the system software. Ensure that you follow them carefully and in the specified order. Table 7 on page 71 provides a checklist so you can track your progress as you perform the upgrade. Make sure you have all the items indicated before beginning the upgrade. Solving upgrade problems If you experience any problems when performing the XCS upgrade procedure, see “Troubleshooting” on page 73 for assistance.
1. Open HP Command View EVA and click the icon of the storage system you want to upgrade. Check for hardware errors. a. Check the Hardware folder in the navigation pane. If there are any hardware caution or warning conditions, HP Command View EVA displays the appropriate icon over the folder. b. Click the Hardware folder to expand the navigation tree. The Hardware Folder Properties window opens. The Operational State box indicates if there is a hardware problem.
2. Replace any hardware components that have failed. TIP: If there is a yellow attention icon, you may still be able to do the upgrade, for example, when leveling is occurring. If any unusual icons are visible, check with HP before doing the upgrade. NOTE: If you must replace any components, see either the HP StorageWorks Disk Enclosure I/O Module Replacement Instructions or the user guide for your array model for information about replacement. See Table 1 on page 10 for links to these guides. 3.
4. Using HP Command View EVA, examine the controller event log and check for any critical events. a. Select the icon of the storage system you want to upgrade in the navigation pane. b. Click View Events. The View Events page opens. c. Click Controller Event Log. The Controller Events page opens in a new browser window. d. Check the Severity field to determine if any unexpected Critical events within the last 48 hours. have occurred The most recent 400 events are displayed.
5. Verify that no changes to the storage system configuration are in progress. For example, you should not be in the process of creating a virtual disk. Configuration changes should not be made within 48 hours before beginning the upgrade. NOTE: • The leveling process does not impact the upgrade. If leveling is in progress, the upgrade can be performed. The leveling will be suspended during the upgrade and resumed when the upgrade is complete.
Step 3. Clearing storage system passwords Estimated time to complete: 10–15 minutes If you use passwords on the controllers, use the following procedure to clear them. Disabling password access in HP Command View EVA Estimated time to complete: 10 minutes To disable password access to a storage system in HP Command View EVA: NOTE: You will need to know the World Wide Name (WWN) of the storage system to disable password access. 1. Start HP Command View EVA in your browser. 2.
Step 5. Upgrading controller software to XCS 09534000 Estimated time to complete: 25–30 minutes CAUTION: • Stop all storage modification jobs (such as creation, deletion, presentation) 30 minutes before beginning the controller software upgrade. • Before upgrading the controller software, ensure that the storage system configuration is stable and is not being changed in any way.
6. The Code Load Storage System – Page 1 window opens. Figure 15 Code Load Storage System-Page 1 window . 7. Click Browse, navigate to the installation CD (that was created from the download .ISO image.) and select the appropriate file as shown in the following table. Table 6 Controller software 56 For this array Select EVA4400 \HSV300\09534000\300_09534000.SSS EVA6400 \HSV400\09534000\400_09534000.SSS EVA8400 \HSV450\09534000\450_09534000.
8. Click Next Step. The Code Load Storage System-Page 2 window opens listing any pre-update application notes. Read them before continuing. Two confirmation screens appear. Respond to both by entering YES (all uppercase) to proceed. Figure 16 First code load confirmation screen . Figure 17 Second code load confirmation screen . 9. Select Code Load System. The new storage system software is copied to the controllers and validated (see Figure 18 on page 57). Figure 18 Code load processing screen .
10. The upgrade process begins and the Initiating firmware code load page opens (see Figure 19 on page 58). This page is displayed while the upgrade file components are processed. Figure 19 Initiating firmware code load . CAUTION: If the upgrade is being performed on an EVA6400/8400 under heavy load, processing of the System Data Collector file component could time out and display one of the following error messages: If either error message appears, click OK.
. 11. In the Initialized Storage System Properties window, verify the version of the storage system software in the Version box. It should be 09534000. Figure 21 Verifying XCS version after upgrading .
12. After 30 minutes, verify the I/O module firmware version and states on each I/O module of each disk enclosure as follows: a. In HP Command View EVA, go to the Hardware folder in the navigation pane and select a disk enclosure. The Disk Enclosure Properties window opens. b. Select the I/O tab. c. Record the firmware version and operational state of each I/O module (both I/O module A and B). Also, record any I/O modules that have blank fields (see Figure 23 for an example). d.
Figure 23 Blank fields on I/O tab . e. Check the operational states that you recorded and proceed as follows: • Good: No action • Loading firmware: The I/O module firmware load is blocked. Corrective action is required somewhere on the array (but not on this I/O module). Continue with Step 13. • Any state other than Good or Loading firmware: Corrective action is required on this I/O module. Continue with Step 13. 13. Check the event log for the code load blocked code (066df308, critical event).
15. Correct any issues found in Step 14 on page 61. a. If there is an I/O module problem, follow the instructions in “Resetting the I/O module” on page 62 for each affected I/O module. After completing the reset, repeat step 11. If no further problems are detected, continue with “Step 6. Upgrading disk drive firmware” on page 63. If the same problems are detected, contact your HP-authorized service representative for assistance. b.
To power cycle the array, complete the following steps: 1. 2. Complete an orderly shutdown of both controllers from HP Command View EVA. Then, power down the array: a. On the EVA4400, push and hold the enclosure power button on the rear of the controller for a minimum of 15 seconds. The power button and the green LED start to blink when held from 4 to 10 seconds. b. On the EVA6400/8400, press and release the power button at the rear of the controller.
CAUTION: Observe the following cautions when upgrading disk drive firmware: • Do not power off any components or perform controller resynchs or reboots during an upgrade. • Do not perform HP Continuous Access EVA copy/merge activities across sites, site failovers, cloning, or grouping or ungrouping of disks during an upgrade. • Do not add to or remove members from DR groups during upgrade. • Ensure that you upgrade the disk drive firmware after you upgrade the storage system software.
7. Click Code load system. The Code Load Selection window opens. Figure 24 Code Load Selection window — disk drives . 8. Select Code Load Disk Drives On Line and click Select. The Code Load Disk Drives On Line - Page 1 window opens. Figure 25 Code Load Disk Drives — Page 1 window . 9. Do one of the following: a. If you are running HP Command View EVA 9.x or later, click Browse and navigate to the zip file or manually enter the path to the zip file (from Step 3.a). b.
10. Click Next step. All disk drives are scanned for configuration information and upgrade eligibility. The results are displayed in a table when the Online Disk Drive Code Load - Page 2 window opens. Figure 26 Code Load Disk Drives – Page 2 window .
11. Click Next step. The disk drive firmware upgrade begins. A status page opens indicating the progress as each disk drive is upgraded. The disk drives are upgraded sequentially. Depending upon the I/O load on the storage system, it can take 30 seconds to 3.5 minutes per drive to upgrade the firmware. The status is updated at 45 second intervals, so you must wait to see which disk drives are complete. CAUTION: If you select any array in the navigation pane to manage it, the disk drive upgrade stops.
Figure 28 Code Load Disk Drives – Page 3 window . 12. Click Finish. Upgrading firmware on an individual disk If it is necessary to upgrade the firmware on an individual disk, the firmware and installation instructions can be downloaded from the following website: http://www.hp.com/support/evadiskfirmware IMPORTANT: Upgrading disk drive firmware on an individual disk can be performed online or offline, unless the disk is a member of a disk group that contains Vraid0 virtual disks.
Long passwords (up to 16 characters) are supported. The password must meet the following requirements: • • • • • 8 to 16 characters in length Can include upper or lower case letters Can include numbers 0 - 9 Can include the following characters: ! “ # $ % & ‘ ( ) * + , - . / : ; < = > ? @ [ ] ^ _ ` { | } Cannot include the following characters: space ~ \ Enabling password access in HP Command View EVA Estimated time to complete: 10 minutes You must enable password access in HP Command View EVA.
Step 8. Resuming storage system operation Estimated time to complete: Varies. After the storage system software and disk firmware have been successfully upgraded, the storage system can be returned to normal operation. 1. Using HP Command View EVA, check the overall status of the storage system to ensure there are no problems. For instructions on checking the status, see “Step 1. Checking the health of the Enterprise Virtual Array” on page 49. 2.
Task checklist Use the following checklist to track your progress and mark when a task has been completed. You can initial and timestamp task completion if you like. Table 7 Upgrade task checklist Task Task complete Step 1. Checking the health of the Enterprise Virtual Array, page 49 Time required: 20–30 minutes Step 2. Configure User-Initiated Service Mode (UISM), page 53 Time required: 10–15 minutes Step 3. Clearing storage system passwords, page 54 Time required: 10–15 minutes Step 4.
Upgrading the Enterprise Virtual Array
4 Troubleshooting Solving HP Command View EVA problems There are a number of issues that may impact the operation of HP Command View EVA and its ability to communicate with the storage system.
Troubleshooting specific HP Command View EVA errors View is not set or view list is null Symptom The HP Command View EVA content pane shows an Operation Failed message with Details: View Is Not Set or View List Is Null. Cause HP Command View EVA cannot build the view of the storage system. Resolution Click OK. Wait one to five minutes, depending on the size of the storage system, and try the command generating this message again.
Possible Cause Corrective Action 404 Error: A .frm (HTML) file may be missing in the HP Command View EVA directory structure. This can occur if the files were changed or if HP Command View EVA was not successfully installed. Reinstall HP Command View EVA. 503 Error: HP Command View EVA may be down when a browser makes a request. The web server returns a 503 (No Service) error because it cannot access the page. Retry the request when HP Command View EVA is up.
No storage systems found Symptom HP Command View EVA does not display any storage systems, even though they are on the fabric. Cause of the error Several conditions can cause this symptom. Table 9 lists some possible causes of these errors and their corrective actions. Corrective action Table 9 Possible causes and corrective actions when no storage system found Possible Cause Corrective Action The management server may not be able to communicate with either controller.
NOTE: Group names are case sensitive. • HP Storage Admins. To access all the features of HP Command View EVA, this security group is required on the management server and must have at least one member (user account). Members have view and manage capabilities. • HP Storage Users. Members have view capability only. This group is required only when a group with extremely limited use of HP Command View EVA is required. Access control 1.
Unable to process command at this time. Retry the command or check all connections Check for any possible connection issues between HP Command View EVA software and the EVA, and restart the disk drive firmware upgrade. Failed - Successful Status Restart the disk drive firmware upgrade. Object not found in View Check for any possible connection issues between HP Command View EVA software and the EVA, and restart the disk drive firmware upgrade.
Figure 31 Status icon for a bad storage system . Solving problems disabling DR group failsafe mode There are a number of issues that may occur with HP Continuous Access EVA. The following website provides access to information for troubleshooting problems with HP Continuous Access EVA: http://h20000.www2.hp.com/bizsupport/TechSupport/Home.jsp?&lang=en&cc=us& prodTypeId=18964&prodSeriesId=471572&lang=en&cc=us Click Troubleshoot a problem under Tasks for HP StorageWorks Continuous Access EVA Software.
Figure 32 Invalid image file (Status code 21006) . Bad image header (Status code 65) HP Command View EVA sends the XCS controller software to the controller in segments. As each segment is received, it is validated by the controller. HP Command View EVA monitors each segment transfer and displays the transfer status information. If a problem occurs, the process stops and HP Command View EVA displays the segment transfer that was not successful.
• Check any WEBES messages. 1. Double click on the System Event Analyzer icon on the management server to run WEBES. 2. Click Full View under either System Log or the appropriate storage system in the left navigation pane. • Check the storage system event logs. 1. Run HP Command View EVA and log in. 2. Select the storage system whose logs you want to view. 3. Click View events to view the event logs that can be displayed.
Troubleshooting
5 Support and other resources Contacting HP HP technical support Telephone numbers for worldwide technical support are listed on the HP support website: http://www.hp.
Websites • HP: http://www.hp.com • HP Storage: http://www.hp.com/go/storage • HP Partner Locator: http://www.hp.com/service_locator • HP Software Downloads: http://www.hp.com/support/downloads • HP Software Depot: http://www.software.hp.com • HP Single Point of Connectivity Knowledge (SPOCK): http://www.hp.
Convention Element CAUTION: An alert that calls attention to important information that if not understood or followed can result in data loss, data corruption, or damage to hardware or software. IMPORTANT: An alert that calls attention to essential information. NOTE: An alert that calls attention to additional or supplementary information. TIP: An alert that calls attention to helpful hints and shortcuts.
Support and other resources
Index A agent options using, 54 allocated capacity, 25 analyzing storage system I/O, 27 array checking for errors, 15, 49 XP, 36 B backing up data, 37 Bad image header error, 80 browsers recommended versions, 41 C capacity allocated, 25 checking hardware status, 16, 50 checklist pre-upgrade task, 46 upgrade task, 71 cluster symbol, 78 components failed, 15 configuration SAN, 18 configuration data collecting, 18 controller events checking log, 52 Controller Events page, 43, 52 corrective action codes, 43,
HP Command View EVA checking hardware, 16, 50 disabling passwords, 54 installing, 38 online help, 15 web server interaction, 74 HP technical support, 83 I I/O module resetting, 62 Insight Remote Support, 41 installation typical, 38 Invalid firmware image file error, 79 IO timeout external device, 36 IOPS, 28 online upgrade, 9 configuration evaluation, 25 considerations, 25 managing host I/O timeouts, 31 selecting when to do, 26 success factors, 25 P password protection, 68 Path Blockade Watch Timer, 36 p
upgrade preparation, 16, 49 upgrade task checklist, 71 upgrading firmware, 64, 68 Replication Solutions Manager, 42 V VCS minimum version before upgrade, 11 verifying software version, 14 View Events page, 43, 52 virtual disk activity viewing, 29 Vraid0 LUNS, 36 W warning conditions, 16 Watch Timer Path Blockade, 36 web server, 74 WOCP, 40 WWN, 28, 46, 54 WWNN, 69 X XP array, 36 HP StorageWorks Enterprise Virtual Array Updating Product Software Guide (XCS 09534000) 89