
HP 517 802.11ac Unified Walljack Configuration Guide v6.4.0

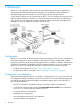


computer to the switch and connect another Ethernet cable from a PoE port on the switch
to the Uplink port on the HP 517.
• If using a PoE injector, first ensure that it is powered off. Then, connect an Ethernet cable
from your computer to the data in port of the PoE injector and connect another Ethernet
cable from the data and power out port on the injector to the Uplink port on the HP 517.
• If using an HP AC/DC Power Adapter (JD055B), connect it to the power connector on
the HP 517.
4. To power on the HP 517, power on either the PoE switch or injector, or connect the HP AC/DC
Power Adapter (JD055B) to the power connector on the HP 517 and then plug it in.
5. Initially, the HP 517 power light blinks green once every two seconds. Wait approximately
one minute until it begins blinking once per second before proceeding to the next step.
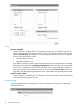
6. Open a web browser (Microsoft Internet Explorer 8+ or Mozilla Firefox 3+) on your computer
and specify the address https://192.168.1.1.
7. At the security certificate prompt, select the option that allows you to continue.
8. On the Login page, specify admin for both Username and Password, and then select Login.
The provisioning tool home page opens.
9. Click Provision at the bottom of the home page and provision the HP 517 using the settings
on the Connectivity and Discovery pages. This is discussed in detail in the following sections.
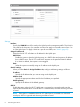
Connectivity page
Use the Connectivity page to define addressing settings for the Uplink port. Select the Connectivity
option in the title bar to enable the connectivity provisioning settings.
Directly provisioning the HP 517 7