
Advanced Traffic Management Guide K/KA/KB.15.15


1. From the Main Menu select 2. Switch Configuration —> 8. VLAN Menu … —> 2. VLAN Names
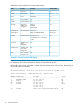
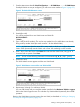
If multiple VLANs are not yet configured, you will see a screen similar to Figure 2 (page 25).
Figure 2 The default VLAN names screen
2. Press A (for Add).
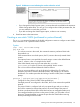
You will be prompted for a new VLAN name and VLAN ID:
802.1Q VLAN ID :
1 Name : _
3. Type a VID (VLAN ID number). This can be any number from 2 to 4094 that is not already
being used by another VLAN (the switch reserves 1 for the default VLAN).
NOTE: A VLAN must have the same VID in every switch in which you configure that same
VLAN. GVRP dynamically extends VLANs with correct VID numbering to other switches.
4. Press ↓ key to move the cursor to the Name line and enter the VLAN name, using up to 12
characters with no spaces. Press Enter.
NOTE: Do not use the following characters in VLAN names: @, #:, $, ^, &, *, (, and ).
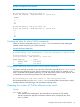
5. Press S (for Save).
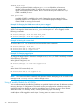
The VLAN Names screen appears with the new VLAN listed.
Figure 3 VLAN Names screen with a new VLAN added
6. Repeat steps 2 through 5 to add more VLANs.
You can add VLANs until you reach the number specified in the Maximum VLANs to support
field on the VLAN Support screen. This includes any VLANs added dynamically due toGVRP
operation.
Return to the VLAN Menu to assign ports to the new VLAN, as described in “Adding or changing
a VLAN port assignment (Menu)” (page 32).
Adding or editing VLAN names (Menu) 25