
Advanced Traffic Management Guide K/KA/KB.15.15
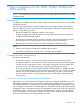

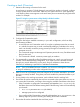
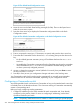
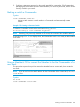
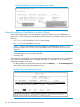

Figure 59 The default Stack Configuration screen
4. Move the cursor to the Stack State field by pressing E (for Edit). Then use the Space bar to
select the Commander option.
5. Press the down arrow key to display the Commander configuration fields in the Stack
Configuration screen.
Figure 60 The default Commander configuration on the Stack Configuration screen
6. Enter a unique stack name (up to 15 characters; no spaces) and press the down arrow key.
7. Ensure that the Commander has the desired Auto Grab setting, then press the down arrow
key:
• No (the default) prevents automatic joining of Candidates that have their Auto Join
set to Yes.
• Yes enables the Commander to automatically take a Candidate into the stack as a Member
if the Candidate has Auto Join set to Yes (the default Candidate setting) and does
not have a previously configured password.
8. Accept or change the transmission interval (default: 60 seconds), then press Enter to return
the cursor to the Actions line.
9. Press S (for Save) to save your configuration changes and return to the Stacking menu.
Your Commander switch should now be ready to automatically or manually acquire Member
switches from the list of discovered Candidates, depending on your configuration choices.
Configuring a Commander switch
Any stacking-enabled switch can become a Commander as long as the intended stack name does
not already exist on the broadcast domain. This is because creating a Commander automatically
creates a corresponding stack.
Before you begin configuring stacking parameters:
1. Configure IP addressing on the switch intended for stack commander and, if not already
configured, on the primary VLAN. For more on configuring IP addressing, see the Basic
Opeations Guide for your switch.
NOTE: The primary VLAN must have an IP address in order for stacking to operate properly.
266 Stack management for the 3500, 3500yl, 6200yl and 6600 switches