
HP Switch zl2 Modules Installation Guide


9
Installing the Modules
Installing the Modules
Overview
Before installing any module, ensure you have loaded the most current
software for that module onto your switch, see
page 1 for the V2 modules
software version. You can install any of the modules into any of the HP
networking chassis zl switches that have compatible module slots.
HP 5400R zl2 Switches:
■ 5406R zl2 and all related bundles
■ 5412R zl2 and all related bundles
“Hot Swap”
Notes
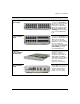
The SFPs can be “hot swapped”. That is, they can be installed or removed after
the module is installed in the switch and the module is receiving power, see
page 12. You can “hot-swap” one module for another; that is, replace one
module with another while the switch is still powered on, without interrupting
the operation of the rest of the switch ports, see
page 20. You may have to
reconfigure the switch if the modules are not the same type, check your
configuration.
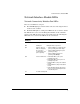
You can install the modules into the switch either with the switch powered on
or off. The following procedures assume the switch is powered on.
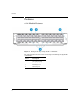
1. Install the modules in a switch slot (page 10).
If you have installed any modules into slots that were previously occupied
by a different type module, you need not reset the switch, instead run the
command “no module <slot>” using the CLI to switch the configuration
to the new switch.
2. If you are using the zl Module that supports SFPs, install the SFPs in the
module. You can install the SFPs before or after installing that module
into the switch (
page 12).
3. Verify the modules are installed correctly (page 14).
4. Connect the network cabling (page 16).
5. Verify the network connections are working properly (page 18).
6. Optionally, customize the configuration for the modules’ ports (unless
the default port configuration is satisfactory for your network application
(
page 19)).