
Management and Configuration Guide K/KA/KB.15.15


This procedure uses the Port/Trunk Settings screen to configure a static port trunk group on the
switch.
1. Follow the procedures in the preceding IMPORTANT note.
2. From the Main Menu, select:
2. Switch Configuration …
2. Port/Trunk Settings
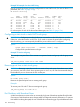
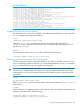
3. Press [E] (for Edit) and then use the arrow keys to access the port trunk parameters.
Figure 49 Menu screen for configuring a port trunk group
4. In the Group column, move the cursor to the port you want to configure.
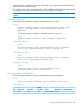
5. Use the Space bar to choose a trunk group assignment (Trk1, Trk2, and so on) for the
selected port.
• For proper trunk operation, all ports in a trunk must have the same media type and mode
(such as 10/100TX set to 100FDx, or 100FX set to 100FDx.) The flow control settings
must also be the same for all ports in a given trunk.
• You can configure the trunk group with up to eight ports per trunk. If multiple VLANs are
configured, all ports within a trunk will be assigned to the same VLAN or set of VLANs.
(With the 802.1Q VLAN capability built into the switch, more than one VLAN can be
assigned to a trunk. See the Advanced Traffic Management Guide.
(To return a port to a non-trunk status, keep pressing the Space bar until a blank appears
in the highlighted Group value for that port.)
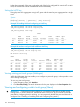
Figure 50 Configuration for a Two-Port Trunk Group
Viewing and configuring a static trunk group (Menu) 137