The HP 560 is a Wi-Fi Alliance authorized Wi-Fi CERTIFIED 802.11ac product. The Wi-Fi CERTIFIED Logo is a certification mark of the Wi-Fi Alliance. In HP 560 802.11ac Access Point Quickstart This Quickstart shows you how to install and get started using the HP 560 Dual Radio 802.11ac Access Point [J9846A (WW), J9845A (AM), J9847A (JP), J9848A (IL)], hereafter referred to as the AP. The latest HP documentation is available at www.hp.com/support/manuals.
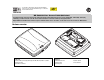
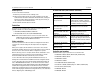
HP 560 Wireless 802.11ac Access Point Quickstart Package contents The AP, AP bracket, padlock bracket, two sets of AP bracket T-bar clips with screws, two mounting screws with wall anchors, retention screw (4-40x1/4”), adapter bracket, and documentation. Ports • Ethernet port: Auto-sensing 10/100/1000 BaseT Ethernet port with RJ-45 connector. The port supports PoE (Power over Ethernet) 802.3af and 802.3at. • Console port: Standard Console (serial) port with RJ-45 connector.
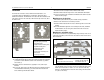
HP 560 Wireless 802.11ac Access Point Quickstart 3 Installation The AP can be mounted on a wall, a wall-mounted electrical box, or a suspended ceiling. The AP Bracket is mounted first, and then the AP is attached to the bracket. The AP Bracket is two-sided: The AP is installed on the side with the UP arrow. The other side, with the T-bar clip screw holes, faces the wall or T-bar. ➁ ➀ ➂ ➄ ➅ ➁ ➀ ➂ ➀ ➂ ➁ ➃ ➅ ➇ ➇ ➂ ➇ Attach the AP on page 4. Mounting on an electrical box 1.
HP 560 Wireless 802.11ac Access Point Quickstart 2. 3. 4. 5. Warning: Areas above false ceilings can contain dangerous electrical cabling, gas pipes, and other hazards. Make whatever safety arrangements are needed to ensure that you can work safely above the false ceiling. HP recommends that you use a non-conductive step ladder such as one made of fiberglass. Position yourself at shoulder-height above the ceiling so that you can attach the second T-bar clip.
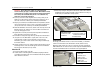
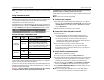
HP 560 Wireless 802.11ac Access Point Quickstart Removing the AP 5 Controllers AP status LED states (with controller connection) To remove the AP from the bracket: 1. Detach any locks and remove the retaining screw. 2. While carefully holding the AP, insert a flat screwdriver into the cable channel between the channel wall and the AP Bracket latch, releasing the AP from the bracket, while being careful to retain grip on the AP as you slide it away from the AP Bracket lock tab. 3.
HP 560 Wireless 802.11ac Access Point Quickstart 6 Note: The remainder of this Quickstart does not apply to controller-managed APs. Using autonomous mode Autonomous mode is supported only with HP MSM software, which will be available in 2014. In autonomous mode, the AP operates as a standalone AP. You configure and manage an autonomous AP by using its web-based management tool, as described in this section. The management tool is organized with menus and sub-menus.
HP 560 Wireless 802.11ac Access Point Quickstart 7 Using autonomous mode in the DHCP server log. For example after Step F.4 below, you can go to the DHCP server log to retrieve the IP address assigned to the AP. example, from the Windows Start menu, select Run and enter arp -d, and then select OK. D. Log in • Assign a static IP address to the AP. The address must be on the same subnet as the network to which the AP connects. 1. Wait until the Power LED is on solid. 2.
HP 560 Wireless 802.11ac Access Point Quickstart 8 Regulatory information Regulatory information This product is a Class B device, pursuant to Part 15 of the FCC Rules. For important safety, environmental, and regulatory information, see Safety and Compliance Information for Server, Storage, Power, Networking, and Rack Products, available at: www.hp.