
HP 560 Wireless 802.11n Access Point Installation Guide


Plenum installation
To install the device in a plenum, you must use plenum-rated cables and attachment hardware. HP
recommends that you install the HP 560 in a similar orientation as in a ceiling installation. However,
a qualified installer can determine how to install and secure the HP 560 in a plenum in an
appropriate and safe manner. See “Plenum installation” (page 16) and “Installing on a suspended
ceiling” (page 9).
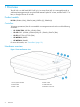
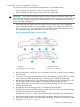
Attach the AP
1. Connect the Ethernet cable to the AP.
2. Hold the bottom of the AP against the AP bracket, aligning the AP tab slots with the AP retention
tabs on the AP bracket. Pull back any Ethernet cable slack at the same time.
3. While firmly holding the AP against the AP bracket, slide the AP toward the AP Bracket lock
tab so that the AP snaps onto the bracket. Do not let go of the AP until you confirm that it is
securely in place.
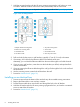
Figure 5 Attaching the AP to the AP bracket
3. AP tab slots snapped onto AP bracket retention tabs1. Lock tab
4. AP bracket latch2. AP bracket
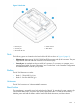
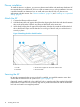
Securing the AP
HP strongly recommends that as soon as the AP is installed, you install the retention screw that
anchors the AP bracket to the AP (callout 2 on Figure 6 (page 11)).
Optionally, attach a cable lock in the cable lock hole or insert the tab of the supplied AP padlock
bracket into the cable lock hole, and then align the AP padlock bracket hole with the AP bracket
lock hole and install a user-supplied padlock.
10 Installing the HP 560