
HP 560 Wireless 802.11n Access Point Installation Guide


2 Installing the HP 560
The HP 560 is suited for indoor installation on a desktop, wall, ceiling, or in a plenum. The end
user is responsible for ensuring that installation and use comply with local safety and radio
regulations.
IMPORTANT: This device requires professional installation. Consult a professional installer trained
in RF installation and knowledgeable in local regulations including:
• Building and wiring codes
• Safety regulations
• Channel, power, and indoor/outdoor restrictions
• License requirements for the intended country
It is critical to identify known RF absorbers, reflectors, and interference sources in the environment
during the planning phase.
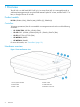
Remove product from packaging
Inspect the package contents and verify that they are free from defects. The package contains:
• The HP 560 Access Point
• An AP mounting bracket
• A padlock bracket
• Two sets of AP bracket T-bar clips with screws
• Two mounting screws with wall anchors
• A retention screw
• An adapter bracket
1
• Documentation
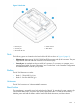
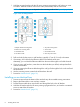
NOTE: The AP bracket is two-sided: Install the AP on the side with the UP arrow. The other side,
with the T-bar clip screw holes, faces the wall or T-bar. The AP bracket is mounted first, and then
the AP is attached to the bracket.
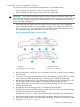
Installing on a wall
When installing the AP on a wall, ensure that the mounting surface and the fasteners you use can
support at least 0.9 kg (2 lb). Allow extra weight for cables.
1. If you are replacing an existing device with an HP 560, you can use this bracket to connect the HP 560 mounting
bracket to the existing mounting bracket.
Remove product from packaging 7