
HP 560 Wireless 802.11n Access Point Installation Guide


Installing on a suspended ceiling
Two sets of T-bar clips are included for installing the AP on a suspended ceiling:
• If the ceiling tiles are recessed, use the 12.5 mm set of T-bar clips.
• If the ceiling tiles are flush mount, use the 4.5 mm set of T-bar clips.
WARNING! Areas above suspended ceilings can contain dangerous electrical cabling, gas
pipes, and other hazards. Make whatever safety arrangements are needed to ensure that you can
work safely above the false ceiling. HP recommends that you use a non-conductive step ladder,
such as one made of fiberglass.
1. Slide one of the T-bar clips into the AP bracket T-bar slot. Attach it using two self-tapping
screws. Select the bracket screw holes marked according to the width of your T-bar: 9/16
inch, 15/16 inch, or 1.5 inch. (The other T-bar clip attaches to the AP Bracket from above
the suspended ceiling, after the bracket is in place on the T-bar.)
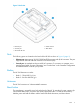
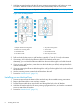
Figure 4 Attaching T-bar clips to the AP bracket
3. AP bracket T-bar slot1. AP bracket
4. Flat tile 4.5 mm T-bar clip2. Recessed tile 12.5 mm T-bar clip
2. Remove/relocate two ceiling tiles, one on each side of the T-bar on which you are installing
the AP bracket.
3. Carrying a screw driver, the AP bracket with T-bar clip attached, the other T-bar clip, and two
screws, position yourself above the T-bar on which you are installing the AP Bracket.
4. Attach the AP bracket onto the T-bar, slide the other T-bar clip into the AP bracket T-bar clip
slot, and then use the screws to attach it such that both T-bar clips grip the T-bar.
5. Tighten all four T-bar clip screws fully and verify that the AP Bracket is securely anchored to
the T-bar from both sides.
6. Re-install the ceiling tile through which you will pass the Ethernet cable.
7. Using the cutout area in the AP bracket as a guide, drill or cut a hole in the ceiling tile large
enough to pass the Ethernet connector through.
Alternatively, you can run a cable under the ceiling tile and through the AP cable channel.
8. If the Ethernet cable is above the ceiling, feed the Ethernet cable down through the hole in
the tile and through the hole in the AP bracket. Pull through an extra 60 cm (2 feet) of cable.
9. Proceed to “Attach the AP” (page 10).
Installing on a suspended ceiling 9