
F3215-HP Load Balancing Module System Management Configuration Guide-6PW101


29
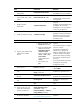
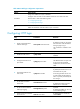
Table 8 Basic Web login configuration requirements
Ob
j
ect Re
q
uirements
LB module
Assign an IP address to a Layer 3 interface.
Configure routes to make sure the interface and the PC can reach each other.
Perform either or both of the following tasks:
• Configuring HTTP login
• Configuring HTTPS login
PC
Install a Web browser.
Obtain the IP address of the LB module's Layer 3 interface.
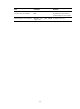
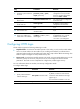
Configuring HTTP login
Ste
p
Command
Remarks
1. Specify a fixed verification
code for Web login.
web captcha verification-code
Optional.
By default, a Web user must enter
the verification code indicated on
the login page to log in.
This command is available in user
view.
2. Enter system view.
system-view N/A
3. Enable the HTTP service.
ip http enable
By default, HTTP service is
enabled.
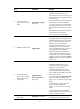
4. Configure the HTTP service
port number.
ip http port port-number
Optional.
The default HTTP service port is 80.
If you execute the command
multiple times, the last one takes
effect.
5. Associate the HTTP service
with an ACL.
ip http acl acl-number
Optional.
By default, the HTTP service is not
associated with any ACL.
Associating the HTTP service with
an ACL enables the LB module to
allow only clients permitted by the
ACL to log in.
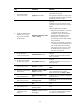
6. Set the Web connection
timeout time.
web idle-timeout minutes
Optional.
By default, the Web connection
timeout time is 10 seconds.
7. Set the size of the buffer for
Web login logging.
web logbuffer size pieces
Optional.
By default, the buffer can save up
to 512 Web login logs.
8. Create a local user and enter
local user view.
local-user user-name
By default, there is a local user
named admin.