
F3726, F3211, F3174, R5135, R3816-HP Firewalls and UTM Devices Attack Protection Configuration Guide-6PW100


24
The icon in the Status column changes to , which indicates that the TCP proxy feature is enabled.
You can click Disable to disable the feature.
The icon indicates that the TCP proxy feature is disabled.
142BAdding a protected IP address entry
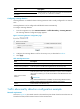
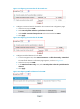
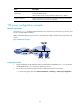
1. Select Intrusion Detection > TCP Proxy > Protected IP Configuration to enter the page shown
in
291HFigure 26.
The page lists information about protected IP address entries and the relative statistics.
Figure 26 Protected IP address entries
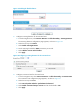
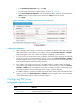
2. Click Add to enter the page for configuring a protected IP address entry.
Figure 27 Protected IP address entry configuration page
3. Enter the destination IP address and select the port number of the TCP connection.
To protect all TCP connection requests to any port of the server at the destination IP address, select
Any from the Port Number list.
NOTE:
The Web performance is degraded if the IP address and port number of the administrator's host are set as
the protected IP entry.
143BDisplaying information about protected IP address entries
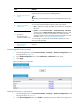
Select Intrusion Detection > TCP Proxy > Protected IP Configuration to enter the page shown in 292HFigure 26,
which lists information about protected IP address entries.
Table 9 Field description
Item Descri
p
tion
Protected IP
IP addresses protected by the TCP proxy feature.
Port Number
Destination port of the TCP connection.
The option any specifies that TCP proxy services TCP connection requests to
any port of the server at the destination IP address.
Type The protected IP address entries can be static or dynamic.