
F3726, F3211, F3174, R5135, R3816-HP Firewalls and UTM Devices Attack Protection Configuration Guide-6PW100

29
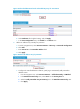
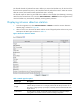
Table 10 Configuration items
Item Descri
p
tion
IP Address Specify the IP address to be blacklisted.
Hold Time Configure the entry to be a non-permanent one and specify a lifetime for it.
Permanence Configure the entry to be a permanent one.
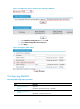
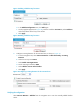
149BViewing the blacklist
Select Intrusion Detection > Blacklist from the navigation tree to enter the blacklist management page,
where you can view the blacklist information.
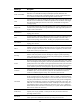
301HTable 11 describes the blacklist fields.
Table 11 Field description
field Descri
p
tion
IP Address Blacklisted IP address.
Add Method
Type of the blacklist entry. Possible values include:
• Auto—Added by the scanning detection feature automatically.
• Manual—Added manually or modified manually.
IMPORTANT:
Once modified manually, an auto entry becomes a manual one.
Start Time Time when the blacklist entry is added.
Hold Time Lifetime of the blacklist entry.
Dropped Count Number of packets dropped based on the blacklist entry.
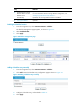
61BBlacklist configuration example
150BNetwork requirements
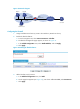
As shown in 302HFigure 35, the internal network is the trusted zone and the external network is the untrusted
zone.
Configure the firewall to satisfy the following requirements:
• Block packets from Host D forever (it is assumed that Host D is an attack source).
• Block packets from Host C within 50 minutes, so as to control access of the host.
• Perform scanning detection for traffic from the untrusted zone and, upon detecting a scanning
attack, blacklist the source. The scanning threshold is 4500 connections per second.