
F3726, F3211, F3174, R5135, R3816-HP Firewalls and UTM Devices System Management and Maintenance Configuration Guide-6PW100


40
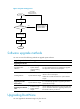
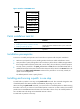
Figure 18 Patches in RUNNING state
178BPatch installation task list
Task Remarks
Installing patches:
• 738HInstalling and running a patch in one step
• 739HInstalling a patch step by step
Use either approach.
Step-by-step patch installation allows you to control the
patch status.
740H
Uninstalling a patch step by step Optional.
179BInstallation prerequisites
To ensure a successful patch operation and normal device operation after the patch installation:
• Make sure each patch file you are installing matches the device model and software version.
• Save patch files or patch package files to the root directory of the device's default storage medium.
If the storage medium has been partitioned, save the files to the root directory of the first partition.
• Correctly name a patch file in the patch_PATCH-FlAG suffix.bin format. The PATCH-FLAG suffix is
predefined and must be the same as the first three characters of the value for the Version field in the
output from the display patch information command. If a patch file is not correctly named, the
system cannot identify the file.
The default patch file name is patch_hfw.bin.
180BInstalling and running a patch in one step
To install and run patches in one step, use the patch install command. This command changes the state
of installed patches from IDLE to ACTIVE or RUNNING, depending on your choice.
When executing the patch install command, you must choose to run installed patches or disable running
them after a reboot. If you choose to have installed patches continue to run after a reboot, the installed
patches are set in RUNNING state and remain in this state after a reboot. If not, the installed patches are
set in ACTIVE state and change to the DEACTIVE state at a reboot.
To install and run patches in one step: