
F3726, F3211, F3174, R5135, R3816-HP Firewalls and UTM Devices VPN Configuration Guide-6PW100


366
• Full customization—You can edit a webpage file of your own to provide a fully customized user
access interface.
1. Partially customize the SSL VPN interface:
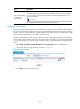
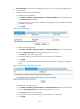
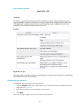
# Configure the text information:
a. Select VPN > SSL VPN > Page Customization > Partial Customization from the navigation tree.
The Text Information tab appears.
b. Configure the service page banner information, login page welcome information, and login
page title on the page.
c. Click Apply.
Figure 262 Text information
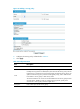
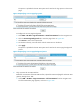
# Configure the login page logo:
a. Select VPN > SSL VPN > Page Customization > Partial Customization from the navigation tree.
b. Click the Login Page Logo tab to enter the page shown in 998HFigure 263.
c. Click Browse to select a local picture file.
d. Set whether to directly overwrite the file with the same name on the device.
e. Click Apply.
The picture is uploaded to the SSL VPN system and is used as the logo picture on the login
page.
Figure 263 Specifying a login page logo picture
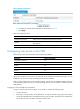
# Configure the service page logo:
a. Select VPN > SSL VPN > Page Customization > Partial Customization from the navigation tree.
b. Click the Service Page Logo tab to enter the page shown in 999HFigure 264.
c. Click Browse to select a local picture file.
d. Set whether to directly overwrite the file with the same name on the device.
e. Click Apply.