
R3166-R3206-HP High-End Firewalls Attack Protection Configuration Guide-6PW101

37
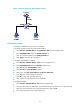
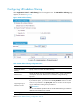
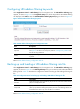
Figure 31 Network diagram of ARP automatic scanning
Configuration procedure
# Configure IP addresses for the interfaces. (Omitted)
# Configure periodic sending of gratuitous ARP packets.
• Select Firewall > ARP Anti-Attack > Send Gratuitous ARP from the navigation tree.
• Select GigabitEthernet0/3 from the Standby Interface list.
• Click << to add the interface to the Sending Interface list.
• Click Apply to complete the configuration.
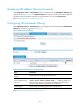
# Configure ARP automatic scanning
• Select Firewall > ARP Anti-Attack > Scan from the navigation tree.
• Select GigabitEthernet0/3 from the Interface dropdown list.
• Type 10.1.1.2 in the Start IP Address textbox.
• Type 10.1.1.50 in the End IP Address textbox.
• Select check box Also scan IP addresses of dynamic ARP entries.
• Click Scan. The confirm dialog box appears.
• Click OK to begin ARP automatic scanning.
• After a while, the page displays “Scan completed”.
# Configure fixed ARP.
• Select Firewall > ARP Anti-Attack > Fix from the navigation tree.
• The page lists two dynamic ARP entries whose IP addresses are 10.1.1.10 and 10.1.1.20 respectively.
• Select the check box before the two dynamic ARP entries, and click Fix.
• The two dynamic ARP entries become static ones.