
R3166-R3206-HP High-End Firewalls Attack Protection Configuration Guide-6PW101


3
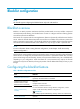
Viewing the blacklist
From the navigation tree, select Intrusion Detection > Blacklist to enter the blacklist management page,
where you can view the blacklist information, as shown in Figure 1.
Table 3 Blacklist fields
Field Descri
ption
IP Address Blacklisted IP address
Add Method
Type of the blacklist entry, which can be:
• Auto—Added by the scanning detection feature automatically.
• Manual—Added manually or modified manually.
Start Time Time when the blacklist entry starts to take effect.
Hold Time Lifetime of the blacklist entry since the effective start time
Dropped Count Number of packets dropped based on the blacklist entry
Return to Blacklist configuration task list.
Blacklist configuration example
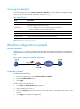
Network requirements
As shown in Figure 3, Host A is located in the trusted zone while Host B is located in the untrusted zone.
Configure the firewall to filter all packets from Host A within 100 minutes since the creation of the blacklist
entry.
Figure 3 Network diagram for blacklist configuration
Configuration procedure
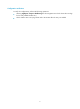
# Enable the blacklist feature.
1. From the navigation tree, select Intrusion Detection > Blacklist.
2. Select the Enable Blacklist option.
3. Click Apply.
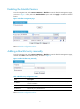
# Add a blacklist entry for Host A.
1. Click Add. The Add to Blacklist page appears.
2. Enter IP address 192.168.1.1.
3. Select the Hold Time option and, in the box next to the option, set the lifetime of the entry to 100
minutes.
4. Click Apply to complete the configuration.