
R3166-R3206-HP High-End Firewalls Network Management Configuration Guide-6PW101


171
# Enable dynamic domain name resolution.
<Firewall> system-view
[Firewall] dns resolve
# Specify the DNS server 2.1.1.2.
[Firewall] dns server 2.1.1.2
# Configure com as the name suffix.
[Firewall] dns domain com
c. Configuration verification
# Use the ping host command on theFirewall to verify that the communication between the Firewall and
the host is normal and that the corresponding destination IP address is 3.1.1.1.
[Firewall] ping host
Trying DNS resolve, press CTRL_C to break
Trying DNS server (2.1.1.2)
PING host.com (3.1.1.1):
56 data bytes, press CTRL_C to break
Reply from 3.1.1.1: bytes=56 Sequence=1 ttl=126 time=3 ms
Reply from 3.1.1.1: bytes=56 Sequence=2 ttl=126 time=1 ms
Reply from 3.1.1.1: bytes=56 Sequence=3 ttl=126 time=1 ms
Reply from 3.1.1.1: bytes=56 Sequence=4 ttl=126 time=1 ms
Reply from 3.1.1.1: bytes=56 Sequence=5 ttl=126 time=1 ms
--- host.com ping statistics ---
5 packet(s) transmitted
5 packet(s) received
0.00% packet loss
round-trip min/avg/max = 1/1/3 ms
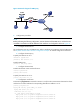
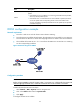
DNS proxy configuration example
1. Network requirements
When the IP address of the DNS server changes, you must configure the new IP address of the DNS
server on each device on the LAN. To simplify network management, you can use the DNS proxy
function.
As shown in Figure 92:
• S
pecifyFirewall as the DNS server of Device (the DNS client). Firewall acts as a DNS proxy. The IP
address of the real DNS server is 4.1.1.1.
• Configure the IP address of the DNS proxy on Device. DNS requests of Device are forwarded to the
real DNS server through the DNS proxy.