
R3166-R3206-HP High-End Firewalls System Management and Maintenance Configuration Guide-6PW101


144
<Firewall> system-view
[Firewall] public-key local create rsa
[Firewall] public-key local create dsa
[Firewall] ssh server enable
# Configure an IP address for interface GigabitEthernet 0/0, which the SSH client will use as the
destination for SSH connection.
[Firewall] interface gigabitethernet 0/0
[Firewall-GigabitEthernet0/0] ip address 192.168.1.40 255.255.255.0
[Firewall-GigabitEthernet0/0] quit
# Set the authentication mode for the user interfaces to AAA.
[Firewall] user-interface vty 0 4
[Firewall-ui-vty0-4] authentication-mode scheme
# Enable the user interfaces to support SSH.
[Firewall-ui-vty0-4] protocol inbound ssh
# Set the user command privilege level to 3.
[Firewall-ui-vty0-4] user privilege level 3
[Firewall-ui-vty0-4] quit
NOTE:
Before performing the following tasks, you must use the client software to generate an RSA key pair on the
client, save the public key in a file named key.pub, and then upload the file to the SSH server through FTP
or TFTP. For more information, see “Configure the SSH client.”
# Import the client’s public key from file key.pub and name it Firewall001.
[Firewall] public-key peer Firewall001 import sshkey key.pub
# Specify the authentication type for user client002 as publickey, and assign the public key Firewall001
to the user.
[Firewall] ssh user client002 service-type stelnet authentication-type publickey assign
publickey Firewall001
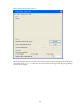
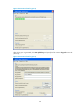
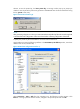
2. Configure the SSH client
# Generate an RSA key pair
Run PuTTYGen.exe, select SSH-2 RSA and click Generate.