
R3204P16-HP Load Balancing Module Typical Configuration Examples-6PW101

7
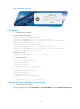
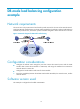
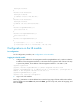
• Use a console cable to connect the serial port of a configuration terminal (usually a PC) to the
console port of the LB module.
• Use a crossover Ethernet cable to connect the Ethernet port of the PC to GE 0/1, the default
management interface of the LB module.
Figure 4 Configuration environment for the LB module
3. Configure a terminal emulation program on the PC
• On the PC, run a terminal emulation program, such as Terminal of Windows 3.X and
HyperTerminal of Windows 9X and Windows XP.
• Set the terminal communication parameters: Bits per second to 9600, Data bits to 8, Parity to none,
Stop bits to 1, and Flow control to none.
4. Enter the command line interface (CLI) (optional)
Power on the LB module. The LB power-on self-test (POST) information will be displayed on the PC. After
the POST, press Enter. The CLI of the LB module appears.
Logging in to the LB module
1. Configure an IP address for the management interface (GigabitEthernet 0/1). Make sure that the
IP address of the management interface is in the same network segment as that of the PC. This step
is optional. By default, the IP address of the management interface is 192.168.0.1/24.
<Sysname> system-view
[Sysname] interface GigabitEthernet0/1 //Enter management interface view
[Sysname-GigabitEthernet0/1] ip address 192.168.10.2 255.255.255.0 //Configure the IP
address of the management interface as 192.168.10.2
[Sysname-GigabitEthernet0/1] quit
<Sysname> save //Save the configuration
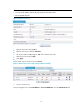
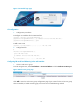
2. Log in to the web interface.
On the PC, open a browser (IE 6.0 or above is recommended), enter the IP address 192.168.10.2 in the
address bar to enter the login page of the LB module web interface. Type the default username admin
and password admin type the verify code, select the language, and then click Login.