
R3721-F3210-F3171-HP High-End Firewalls Attack Protection Configuration Guide-6PW101


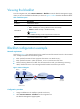

4
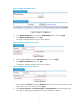
Figure 4 Enabling the blacklist feature
3. In the Global Configuration area, select the Enable Blacklist option, and click Apply.
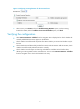
4. In the Blacklist Configuration area, click Add.
The page for adding a blacklist entry for Host D appears.
Figure 5 Adding a blacklist entry for Host D
5. Enter IP address 5.5.5.5, select the Permanence option., and click Apply
6. In the Blacklist Configuration area, click Add.
The page for adding a blacklist entry for Host C appears.
Figure 6 Adding a blacklist entry for Host C
7. Enter IP address 192.168.1.5, select the Hold Time option, in the box next to the option, set the
lifetime of the entry to 50 minutes and click Apply
8. Select Intrusion Detection > Traffic Abnormality > Scanning Detection from the navigation tree.
The page for configuring scanning detection for the untrusted zone appears.