
R3721-F3210-F3171-HP High-End Firewalls High Availability Configuration Guide-6PW101


63
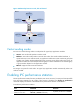
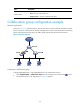
Figure 36 Configuring a collaboration group
To assign a port to the collaboration group, select the box in front of the port and click Apply. Ports that
are not selected do not belong to the collaboration group.
NOTE:
• A port can belong to only one collaboration group.
• The page for configuring a collaboration group displays all the current member ports of the
collaboration group, as well as the ports that do no belong to any collaboration group.
• Do not assign more ports to a collaboration group than can be supported by it (for example, up to 8 fo
r
Collaboration Group 1, as shown in Figure 36).
• Do not assign the port that is used to log on to the Web and ports that are down to the same
collaboration group. Otherwise, the firewall will be disconnected.
Displaying the status of a collaboration group and
its member ports
To check the status of a collaboration group, select High Reliability > Collaboration Group from the
navigation tree to enter the page for displaying collaboration groups, as shown in Figure 35. T
o display
the status of a collaboration group's member ports, click the icon for the collaboration group to enter
the page for configuring the collaboration group, as shown in Figure 36.
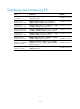
Table 8 de
scribes the status of collaboration groups and their member ports in details.
Table 8 Description of the status of collaboration groups and their member ports
Title Descri
p
tion
Collaboration Group
Status
•
Initial—The collaboration group does not have any member port.
•
Up—All member ports of the collaboration group are up.
•
Down—One port in the collaboration group is physically down, other ports are
administratively down.
•
Ambiguous—The status of the collaboration group is not stable. You cannot
decide the status of the collaboration group until a 10-second timer expires.