
R3721-F3210-F3171-HP High-End Firewalls System Management and Maintenance Configuration Guide-6PW101


35
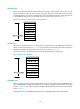
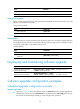
Figure 17 Patches are running
Hotfix task list
Task Remarks
Install patches:
• Installing a patch in one step
• Installing a patch step by step
Use either approach.
The step-by-step patch installation allows you to
control the patch status.
Uninstalling a patch step by step Optional.
Hotfix prerequisites
Patches are released per device model or card type. Before patching the system, you need to save the
appropriate patch files to the storage media of the device using FTP or TFTP. When saving the patch files,
note that the following guidelines:
• The patch files match the device model and software version. If they are not matched, the hotfixing
operation fails.
• Name a patch file properly. Otherwise, the system cannot locate the patch file and the hotfixing
operation fails. The name is in the format of "patch_PATCH-FLAG suffix.bin". The PATCH-FLAG is
pre-defined. The first three characters of the version item (using the display patch information
command) represent the PATCH-FLAG suffix. The PATCH-FLAG of a firewall is PATCH-HFW, and the
name of the patch file must be patch_hfw.bin. The system searches the root directory of the storage
media for patch files based on the PATCH-FLAG. If there is a match, the system loads patches to or
install them on the memory patch area.
Installing a patch in one step
To install patches in one step, execute the patch install command with specifying the source of the patch
file.
After you execute the command, the system displays the message "Do you want to continue running
patches after reboot? [Y/N]:".
• Entering y or Y: All the specified patches are installed, and turn to the RUNNING state from IDLE.
This equals execution of the commands patch location, patch load, patch active, and patch run.
The patches remain RUNNING after system reboot.