
HP StorageWorks SAN Director Installation Guide (A7393-90009, May 2007)


SAN Director installation guide 123
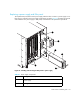
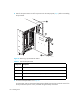
Removing a power supply
Use these steps to remove a power supply. Figure 32 and Table 35 identify power supply
components.
1. If the SAN Director is not operating during the replacement procedure, skip to step 2.
If the SAN Director is going to continue operating during the replacement procedure, check the
power LEDs to verify that the minimum number of power supply units required is still functioning.
A fully populated 4/256 SAN Director requires a minimum of one power supply in any slot at
all times to ensure power. For maximum availability of the Director, you should have a minimum
of one power supply unit in slot 1 or 3, and one in slot 2 or 4.
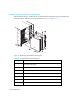
2. Push the locking tab toward the power supply unit, and pull the handle out and down. See
Figure 32.
NOTE: Support the power supply unit from underneath while removing it from the chassis.
3. Use the handle to pull the power supply out of the chassis. See Figure 32.
4. If you are not replacing the power supply unit, orient the filler panel so the handle is vertical and
the side tabs are on the right; then, push the filler panel into the slot.
Reinstalling a power supply
Use these steps to install a power supply.
NOTE: Do not force the installation of the power supply unit or filler panel. If the unit does not
install easily, verify that it is properly oriented.
Ensure that the handle is unlocked; otherwise, damage might occur to the power supply unit and
chassis during the installation.
1. If a filler panel covers the slot, pull it out by the handle. See Figure 32.
2. Orient the power supply unit with the handle toward the front of the chassis and the LEDs on the
left.
3. Unlock the handle by pressing the locking tab.
4. Insert the unlocked power supply unit completely into the slot and push the handle up until it
clicks.
5. Verify that the power supply unit is seated by pulling gently on the handle.
6. Verify that the power LED on the power supply unit displays a steady green light.
7. If it does not, ensure that both AC power connector cables are plugged in and both AC power
switches are flipped to 1 (AC switch lights up green).