
HP StorageWorks SAN Director Installation Guide (A7393-90009, May 2007)


Installing FRUs124
Port blade and filler panel summary
This section provides instructions for replacing port blades and filler panels. This section also
provides recommendations for cable management.
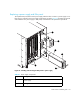
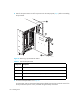
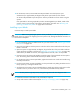
A filler panel should be removed only when it is to be replaced with a port blade or new filler
panel, (see Figure 35). Any slot that is not occupied by a port blade should be occupied by a filler
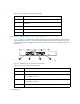
panel to ensure correct cooling of the chassis and protection from dust. Slots are numbered from one
through ten, from left to right, when facing the port side.
CAUTION: Wear a grounded ESD strap when handling a port blade. Use the grounding
connections above the power connectors on the chassis.
Do not force the port blade installation. If the port blade does not slide in easily, make sure it is
correctly aligned inside the rail guides before continuing. Installing a port blade with incorrect
alignment damages both the chassis and the replacement part.
Hold the port blade by the edges of the metal pan. Do not use the ejectors to hold a port blade.
Disassembling any part of a port blade voids the part warranty and regulatory certifications. There
are no user-serviceable parts in the port blade.
Replacing a port blade
The replacement procedure for each port blade or filler panel takes less than 10 minutes. Obtain the
following items:
• ESD (electrostatic discharge) grounding strap
• Workstation computer
• Replacement port blade or filler panel
• Phillips screwdriver
• Small form-factor pluggable (SFP) transceivers, as needed
• Optical cables, as needed