
HP StorageWorks SAN Director Installation Guide (A7393-90009, May 2007)


SAN Director installation guide 125
NOTE: Some optional port blades differ slightly in design. Follow the instructions that pertain to
your specific port blade model.
To remove an existing port blade:
1. Check the power LED, status LED, port speed LED, and port status LED to determine any possible
problems with the current port blade.
A failed port blade can be identified by inspecting the LEDs on the front panel of each port
blade (see Figure 15 on page 70 and Figure 16 on page 72). The WWN bezel on the nonport
side of the Director also displays a power and status LED for each port blade.
2. Before replacing a port blade, establish a telnet or console connection to determine a failure
and verify operation after replacement. Refer to the HP StorageWorks Fabric OS administrator
guide for information about checking the status of hardware components using the CLI.
3. Check for adequate cable slack.
Make sure there is plenty of cable slack to remove a port blade without optical, power, or
Ethernet cable obstruction. See ”Recommendations for cable management” on page 95 for
cabling guidelines.
4. Verify that you have the proper spare part (filler panel or replacement port blade).
Make sure that the part number on the unit being replaced matches the replacement part
number. The chassisShow command displays information about the port blades, including
part numbers, serial numbers, and additional status.
5. Verify that traffic is not flowing through the port blade (port speed LEDs and port status LEDs
should be off) before disconnecting cables.
NOTE: Before removing any cables from a faulty port blade, make a note of cable order (identify
each cable via its physical port). This reduces confusion during recabling. If multiple port blades are
being replaced, replace one card at a time to prevent confusion during cable reconnection. Before
replacing a port blade, determine whether it is the entire card or only the SFPs that are faulty.
6. Disconnect all cables and SFP transceivers from the port blade.
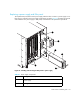
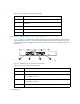
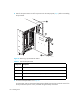
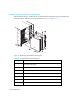
7. For the FC2-16, FC4-16, FC4-32 and FC4-16IP port blades: Turn the port blade off by sliding the
slider switch in the top ejector down, to the off position (see Figure 34 and Table 37). This
initiates a hot-swap request.
For the FC4-48 port blade: Adjust the ejectors to the open position. Unscrew the two thumb
screws from the top and bottom ejectors on the port blade using the Phillips screwdriver. Unscrew
the top thumb screw until it pops out.