
HP StorageWorks SAN Director Installation Guide (A7393-90009, May 2007)

SAN Director installation guide 129
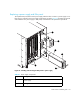
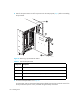
Removing port blade filler panels
Before starting this procedure, see ”Identifying port blade filler panel types” on page 128 to
determine your specific filler panel type.
1. To remove a filler panel with a handle:
a. Unscrew the two captive screws securing the filler panel.
b. Grasp the handle in the middle of the filler panel faceplate and remove.
2. To remove a filler panel with ejectors:
a. Push in the yellow tab on each ejector.
b. Lever both ejectors all the way open, and remove the filler panel from the chassis.
3. To remove a filler panel with pull tabs:
a. Unscrew the top and bottom captive screws on the filler panel.
b. Pull on the top and bottom pulling tabs to slide the filler panel out of the chassis.
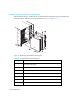
Replacing port blade filler panels
Before starting this procedure, see ”Identifying port blade filler panel types” on page 128 to
determine your specific filler panel type
1. To install a filler panel with a handle:
a. Align the flat side of the filler panel inside the upper and lower rail guides in the slot.
b. Slide the filler panel into the slot (with slight pressure to the left) until it is firmly seated.
c. Tighten the two captive screws using the Phillips screw driver.
2. To install a filler panel with ejector handles:
a. Orient the filler panel so that the ejectors are at the front of the chassis and the flat side of the
filler panel is on the left.
b. Open the ejectors to approximately 45 degrees, align the flat side of the filler panel inside
the upper and lower rail guides in the slot, and slide the filler panel into the slot, with slight
pressure to the left, until it is firmly seated.
c. Close the ejectors by pushing the black handles toward the center of the filler panel until the
ejectors lock (slight audible click). The levering action of the handles seats the filler panel in
the slot.
3. To install a filler panel with pull tabs:
a. Orient the filler panel so that the captive screws are at the front of the chassis and the flat
side of the filler panel is on the left.
b. Screw the captive screws in place, securin the filler panel to the chassis.
More tips on managing cables
You can manage cables in a variety of ways, such as routed down through the cable management
comb or routed out either side of the chassis, and by using patch panels or cable channels on the
sides of the cabinet.