
HP StorageWorks SAN Director Installation Guide (A7393-90009, May 2007)


Installing FRUs132
Time and items required for replacing a blower assembly
The replacement procedure for each blower assembly takes less than 5 minutes.
The following items are required for the blower assembly replacement procedure:
• Replacement blower assembly
• Phillips #2 screwdriver
Removing a faulty blower assembly
CAUTION: Support the blower assembly from underneath while removing or inserting it from the
chassis.
B
To remove a blower assembly:
1. Before removing one blower assembly, verify that the other two blower assemblies are
functioning correctly. The power LEDs should be steady green and the attention/fault LEDs
should not be lit.
For information about how to check the status of hardware components using the command line
interface, refer to the HP StorageWorks Fabric OS administrator guide.
2. Use the screwdriver to loosen the captive screws at the top and bottom of the blower assembly.
3. Push in the top of the handle, then, pull out the lower part of the handle to pull the blower
assembly out of the chassis.
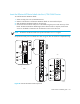
Installing a replacement blower assembly
CAUTION: Do not force the installation. If the blower assembly does not slide into the chassis
easily, ensure it is properly oriented before trying again.
B
Use these steps to install a blower assembly.
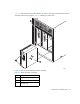
1. Orient the blower assembly as shown in Figure 36 and slide it into the chassis, pushing firmly to
ensure that it is seated.
2. Verify that the power LED displays a green light.
If not, ensure that the blower assembly is seated correctly.
3. Push the top of the handle into the recess.
4. Use the screwdriver or your fingers to tighten the captive screws.