
HP StorageWorks SAN Director Installation Guide (A7393-90009, May 2007)


Installing and configuring the 4/256 SAN Director42
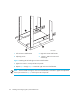
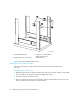
Installing the switch in a rack
These sections contain specific information about installing the 4/256 SAN Director in an HP
10,000 series or HP System/e rack.
WARNING! For safety reasons, when installing this product in an equipment rack, you must
consider rack stability against tipping. Please refer to the user manual provided with the equipment
rack to determine rack stability; the manual is available through the HP web site:
http://www.hp.com/racksolutions/pr odinfo/racks/index.html
.
If the necessary stability is not achieved through the placement of additional equipment, the
equipment rack must be anchored to the building structure before operation.
HP only supports a maximum of two SAN Director switches in a rack.
Pre-installation checklist
Review the following checklist before installing the switch.
• Prepare a site plan.
• Verify that required technical personnel (two technicians) are available and scheduled for the
installation.
• Obtain the required fiber-optic cables (multimode or single-mode). Verify cable length and
required connectors.
• If applicable, obtain the necessary remote workstations or Simple Network Management
Protocol (SNMP) workstations. Workstations are customer-supplied and connected through a
corporate or dedicated LAN.
• Verify that the front panel air temperature does not exceed 40°C (104°F) during operation.
• Verify that all equipment installed in the rack has a reliable branch circuit ground connection,
and does not rely on a connection to a branch circuit, such as a power strip.
• Verify that the rack is balanced.
• Check that the rack is mechanically secured to insure stability in the event of an earthquake.
Items required for installation
Locate the following items before beginning the installation procedure:
• Lift device—A minimum of two people and a hydraulic or assisted lift are required to move the
switch from the pallet to its operating location.