
HP StorageWorks SAN Director Installation Guide (A7393-90009, May 2007)


Installing and configuring the 4/256 SAN Director44
NOTE: The 4/256 SAN Director can be installed facing either direction, if serviceability and
cooling requirements are met.
• Plan for cable management before installing the chassis (see ”Managing cables” on page 57).
Cables can be managed in a variety of ways, such as by routing cables below the chassis, to
either side of the chassis, through cable channels on the sides of the cabinet, or by using patch
panels.
• Verify that two dedicated electrical branch circuits with the following characteristics are
available:
• 200–40 VAC, 50–60 Hz
• Protected by a circuit breaker in accordance with local electrical codes
• Supply circuit, line fusing, and wire size adequate to the electrical rating on the chassis
nameplate
• Location close to the 4/256 SAN Director chassis and easily accessible
• Grounded outlets installed by a licensed electrician, compatible with the power cords
NOTE: To maximize fault tolerance, connect each power cord to a separate power source.
• Ensure that the blowers in the 4/256 SAN Director have access to a total minimum air flow of
350 cu ft per minute (595 cu m per hour).
• Ensure that the air intake and exhaust vents have a minimum of 2 in. of airspace.
• Ensure that the air temperature on the air intake side is less than 40 degrees Celsius (104
degrees Farenheit) during operation.
• Verify that the additional weight of the chassis does not exceed the rack’s weight limits.
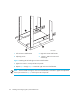
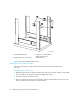
Installing the switch in HP specified racks
Use the following procedure to install the 4/256 SAN Director in an HP 10,000 series or HP
System/e rack using the 14U Rack Mount Kit supplied with the switch. Allow approximately
45 minutes to complete this procedure.
NOTE: These instructions describe how to install the switch in the bottom area of the rack (section
closest to the floor). You may need to orient 14U Rack Mount Kit hardware based on your particular
rack’s configuration.
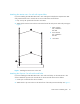
Attaching the rack mount shelf brackets
Use these steps to install the rack mount shelf brackets.