
HP StorageWorks SAN Director Installation Guide (A7393-90009, May 2007)


Installing and configuring the 4/256 SAN Director60
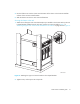
CAUTION: Do not route the cables in front of the air exhaust vent, which is located at the top of the
port side of the chassis.
Arrange the cables so that the minimum bend radius is not exceeded; for a 50-micron cable, the
minimum bend radius is 2 inches under full tensile load and 1.2 inches with no tensile load.
Tie wraps are not recommended for optical cables because they are easily overtightened and can
break the optical cables.
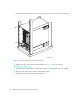
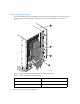
To keep LEDs visible and make it easy to replace components, route cables down in front of the
cards, not across adjacent cards or in front of the power supplies. Figure 13 provides an example in
which cables for each card are routed in front of that card and are out of the way of other
components.
Leave at least one meter of slack for each fiber optic cable. This provides room to remove and
replace the port blade, allows for inadvertent movement of the rack, and helps prevent the cables
from being bent to less than the minimum bend radius.
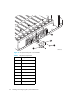
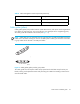
Use the cable guides provided with the 4/256 SAN Director to group the cables. These guides help
to keep individual ports accessible by keeping the cables evenly spaced. If ISL Trunking is in use,
grouping the cables by trunking group is recommended. The ports are color-coded to indicate
which ports can be used in the same ISL Trunking group: four ports marked with solid black ovals
alternate with four ports marked with oval outlines.
NOTE: ISL Trunking is a Fabric OS feature that enables distribution of traffic over the combined
bandwidth of up to eight ISLs between two directly adjacent switches, while preserving in-order
delivery.