
HP A3716A DDS-3 Autoloader User's Manual - 3716-96001

Installing Your Autoloader
Overview
2-2
Overview
The installation process consists of the following steps. They are described
more fully beginning on page 2-4.
1 Shut down the operating system on the computer to which the autoloader is
to be connected and power down the computer.
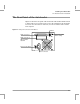
2 Check the autoloaders SCSI ID, and reset it if you want to change the default
setting of 3.
3 Check the default autoloader option switch setting of 6.
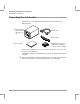
4 Connect the SCSI cable.
5 If the autoloader is the last device on the SCSI bus, ensure that the SCSI
terminator is attached to one of the SCSI connectors on the rear panel.
Failure to do so could cause intermittent failures.
6 Connect the power cord.
When you have finished, you need to check the installation. This is covered in
Chapter 3.
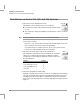
Tools You May Need
You do not need any special tools to install the autoloader. If you need to
change the SCSI ID on the autoloader, you will need a narrow pointed object
such as a ball-point pen or small screwdriver.