
HP A3716A DDS-3 Autoloader User's Manual - 3716-96001

Installing Your Autoloader
Installation on Series 700, 800 and 900 Systems
2-4
Installation on Series 700, 800 and 900 Systems
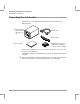
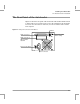
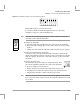
1 Check and reset the SCSI ID if necessary.
The SCSI ID of the autoloader is set to 3 at the factory.
n Look at the rear panel of the autoloader and check that it is still
set to 3.
n You only need to change the SCSI ID if you already have a device on the bus
with ID 3.
Note Do not use SCSI ID 7, which is reserved for the SCSI controller.
To change the SCSI ID:
Press the + and − buttons above and below the SCSI ID display on the rear
of the autoloader to increase or decrease the number.
Use a ball-point pen or small screwdriver. Do not use a pencil because
particles of pencil lead might get into the autoloader.
2 Check the autoloader option switch value (default is 6).
The autoloader option switch on the rear panel of the autoloader
allows you to configure the autoloader for different computer
systems. The correct settings for different systems are shown in
the following table:
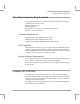
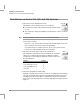
3 Check the configuration switch setting.
When the autoloader is powered on, it reads a set of configuration switches that
tells it how to handle data compression, non-Media Recognition System tape
cartridges and other options. These configuration switches are located in a
deep recess on the underside of the autoloader. The default setting is shown in
figure 2.2.
System Setting
Series 700 7
Series 800 (HSC connect) 7
Series 800 (NIO connect) 6
Series 900 6
SCSI ID
Option
Switch