
HP A3716A DDS-3 Autoloader User's Manual - 3716-96001

Installing Your Autoloader
Installation on Series 700, 800 and 900 Systems
2-5
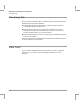
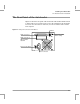
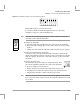
Figure 2.2 Configuration switches (shown in default positions)
This default setting is correct for HP systems.
If you want to disable the Media Recognition System (see Choosing
Cartridges on page 6-7), switch 3 should be ON.
Note Shut down the operating system and power off the computer system before
removing or connecting any SCSI cables.
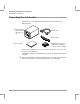
4 Connect the SCSI cable:
a Attach the SCSI cable to SCSI connector 1 on the rear of the autoloader.
b Snap both of the retaining clips over the cable connector to secure it firmly
in place.
c Connect the other end of the cable to the SCSI connector on your computer.
5 Remove the SCSI terminator if necessary.
You only need to remove the terminator if the autoloader is situated in the
middle of the SCSI bus with some other device at the end. In this case, plug the
SCSI cable going to the next device into SCSI connector 2 on the back of the
autoloader.
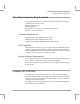
6 Connect the power cord.
The autoloader will operate using any voltage in the range 100 to
240 volts. No adjustment is needed. To connect your autoloader
to the power supply, proceed as follows:
a Ensure that the power switch on the autoloader is off (set to 0).
b Attach the power cord to the connector on the rear of the autoloader.
c Plug the other end of the cord into a nearby power socket.
Note Make sure you power on the autoloader and other peripherals on the SCSI bus
before you power on the computer system, otherwise the computer system will
not see them.
On On Off On On On On On
On/off switch
3
+
−