
Installation Guide for 100VG Recessed Transceivers 1995-11

1. Insert the transceiver into the slot.
The transceivers are installed into an HP networking device in an identical
manner, as follows:
1. Remove AC power from the HP networking device or device module; then,
using a flat-bladed or Torx T-10 screwdriver, unscrew the two retaining
screws on the existing transceiver, or 100VG Xcvr cover plate, and remove
it from the HP networking device or device module.
2. Touch a grounded, metal object (such as a powered on hub) to discharge
any static electricity on your body, then carefully remove the transceiver
from its protective anti-static packaging. Hold the transceiver by its edges,
taking care not touch any of its metal connectors.
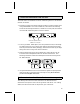
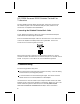
3. Slide the transceiver firmly into the 100VG Xcvr slot as far as it will go.
The transceiver’s faceplate should touch the face of the device. The
following illustration shows two twisted-pair transceivers sliding into an
HP 100VG Module.
4. Using the flat-bladed or Torx T-10 screwdriver, tighten the spring-loaded
retaining screws on the transceiver until they are snug. Be careful that
you do not overtighten the screws.
2. Connect network cables to the transceiver or port.
The cabling instructions for each transceiver are different and are
described in the specific section of this guide for that device. For cabling
details, find the section that corresponds to your transceiver.
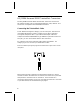
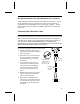
Loosen the captured screws on
a 100VG Xcvr cover plate.
3