
Installation Guide (J3191A, J3192A, and J3193A) 1996-09


12
Installing the 100Base-T Module in an Unused Slot
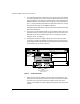
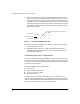
9. Check the port LEDs for the newly-installed module to ensure that the
port(s) connected in the preceding step are operating correctly. (If you
have not already done so, install the LED label strip as described in step
1 on page 7.) The “port-enabled” LED (1, 2) will be lit for each port that is
operating correctly. The transmit (Tx) and/or receive (Rx) LEDs for each
port that is transmitting and/or receiving packets will flash when traffic
is detected on the port.
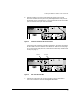
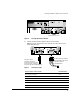
Figure 8. Port LEDs for the 100Base-T Module
10. Customize the port configuration, if necessary. (See “Customizing the
Port Configuration”, below.)
11. Reboot the switch, since this is a new module being installed. (See
“Rebooting the Switch” on page 13 for more information on when the
switch must be rebooted.)
Customizing the Port Configuration
If the slot in which you installed the 100Base-T Module was empty the last
time the switch was either rebooted or reset (or the power to the switch was
cycled), then the module will use preconfigured default parameter values that
will work for most networks.
The default 100Base-T port configuration is:
■ Enabled: Yes
■ Mode: 100 Mbit/s-Half Duplex
■ Trunk (port trunking): None
■ Broadcast Limit: 0
If the default port configuration listed above is not acceptable for your
network, then configure the port(s) in the module by using the switch console
interface. (See the Console User’s Guide shipped with the Switch 2000, and
the online Help provided in the console interface itself.)
Port-Enabled LED
Transmit LED
Receive LED
1
Tx
Rx
Dx 2
Tx
Rx
Dx
Full-Duplex LED (Lit When Port Is Configured for
Full Duplex)