Installation Guide HP J2443A 8-Mbyte Memory Upgrade for the HP Router 650
© Copyright Hewlett-Packard Company 1994. All rights reserved. Publication Number 5962-8323 Edition 1, August 1994 Printed in USA Product Numbers This guide provides installation instructions for the following Hewlett-Packard Company product: J2443A Warranty The information contained in this guide is entirely unwarranted. This document contains proprietary information, which is protected by copyright.
Introduction Introduction If you will be using the HP Router 650 with very large networks, installing the HP J2443A 8-Mbyte Memory Upgrade will help keep network performance at a high level. (A network with more than 50 routers running OSPF or a network with more than 1,000 subnets would be considered very large.) Ensure that you have the following items.
Ensure that you have the following items. Caution Use the precautions described below while performing the procedures described in this installation guide. To avoid damage to the HP Router 650, switch off all power supply modules, or disconnect all power cords, before removing the routing engine (the module in slot 1, the topmost slot). The routing engine and its PCMCIA flash card and memory modules may not be “hot swapped,” that is, changed while power is connected to the router chassis.
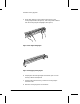
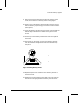
Install the memory upgrade. Install the memory upgrade. You will install the memory upgrade on the routing engine, which is the module located in slot 1 (the topmost slot). 1. Disconnect the console cable from the routing engine. 2. Open the front door of the router by pulling its lock—the round post at the upper right—to the right. (See figure 1.) Figure 1. Opening Router Door 3. Switch off the power supply by pressing the bottom of its switch (marked with “ ❍ ”).
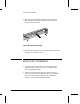
Install the memory upgrade. 5. Press down slightly on the insides of both locks on the routing engine bezel (see figure 2), then swing them outward until the routing engine disengages (see figure 3). Figure 2. Unlocking Routing Engine Figure 3. Disengaging Routing Engine 6. Grasping the left and right edges of the bezel, pull out until the tray is about half exposed. 7. Grasping the sides of the tray, remove the routing engine from the router. 8. Place the routing engine on a flat surface.
Install the memory upgrade. 9. Disconnect the grounding wrist strap from the back of the router, and connect it to the tray of the routing engine. 10. Position one of the memory modules above the rear socket, with the memory chips facing you and the connectors down. (See figure 4.) 11. Lower the memory module into the socket, ensuring that the bottom edge of the module is seated in the groove in the socket. 12. Tilt the top of the memory module back and rest it against the socket. 13.
Verify router initialization. 16. Pull the locks on the bezel outward, then push evenly on both ends of the bezel until it engages fully and the locks swing inward to about 45°. Figure 5. Reinstalling Routing Engine 17. Push the two locks evenly to close them, pressing downward slightly to secure them in place. Verify router initialization. 1. Connect a console to the router—refer to the procedure described under “Connect a console” in chapter 1 of the router’s Installation Guide. 2.
Troubleshooting Troubleshooting After you have installed the memory upgrade, if the LEDs during the power-on self-test indicate a routing engine failure (refer to table 3-1, “LED Error Patterns During Power-On Self-Test,” in chapter 3 of the router’s Installation Guide), the cause could be a failure of either of the memory modules or of the routing engine. To determine which is faulty, use the procedure in table 1 below. Table 1. Troubleshooting Routing Engine Failure After Installing Memory Upgrade 1.
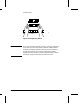
Troubleshooting Figure 6. Removing Memory Module Note 10 If one of the memory modules is faulty, you can still operate the router with just one of the memory modules (4 MB) installed. However, the remaining memory module must be installed in the rear socket. When you receive a replacement memory upgrade from HP, remove the remaining good memory module and send it, along with the faulty module, back to HP.
Part number: 5962-8323 E0894 Printed in U.S.A.