
Installation Guide, Third Edition - Server Expansion Unit


Chapter 4
Cabling and Power Up
HP 9000 rp8400 server Upgrade and SBA Cable Installation
48
Step 5. Use a T-15 TORX driver to remove the screw holding each shroud being careful not to drop the
screw into chassis.
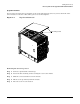
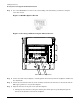
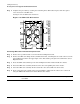
Figure 4-7 Old Backplane Shroud
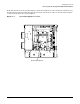
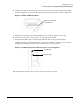
Figure 4-8 Locating and Removing the Shroud Screws
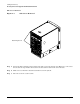
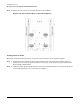
Step 6. On the other side of the backplane, carefully pull the shrouds away from the backplane and discard
the old shrouds.
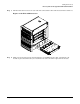
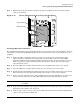
Step 7. Orient the new shroud so that the screw assembly attached to the shroud is on the bottom and the
RFI copper gasket faces away from backplane.
Step 8. Align the shroud over the pins on the system backplane.
a. Gently press the shroud over the pins ensuring that all the pins are protruding through the
shroud as the shroud is seated on the backplane.
Shroud Screw Locations