
Installation Guide, Third Edition - Server Expansion Unit


Chapter 4
Cabling and Power Up
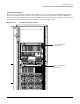
HP 9000 rp8400 server Upgrade and SBA Cable Installation
60
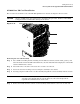
Step 6. If a blocking plate is attached to the core I/O assembly being changed, remove the blocking plate
and transfer it to the replacement core I/O assembly.
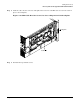
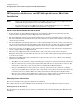
Figure 4-22 Core I/O Card Detail
Installing the Core I/O Assembly
IMPORTANT If the igelan and c8xx drivers are not already in the kernel, they must be added before
installing the A7109A core I/O cards in the HP 9000 rp8400 server.
Step 1. Visually inspect the replacement part for proper number and revision.
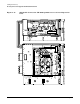
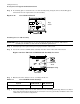
Step 2. Locate the core I/O card DIP switch assembly near the center of the card on the bottom.
Figure 4-23 Core I/O Card and DIP Switch Assembly Location
Step 3. Ensure both of the switches are set according to Table 4-1.
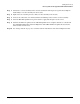
Step 4. Locate the battery on the new core I/O card. Remove the insulating mylar strip. If there is no mylar
strip, then momentarily break the battery connection to clear any previously stored data that could
conflict with your current configuration.
Table 4-1 Core I/O DIP Switch Settings
System DIP Switch 1 DIP Switch 2
HP 9000 rp8400 server On On
Front View
View
Top
Rear View
Mylar strip
Bottom
View