
User Service Guide, Fourth Edition - Server Expansion Unit


Chapter 5
Removal and Replacement
Removing and Replacing a DDS-4 or DVD Drive
51
Removing a DDS-4 or DVD Drive
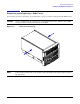
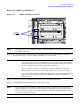
Figure 5-9 DDS-4 or DVD Drive Detail
NOTE The figure shown above displays two DVD components. Either or both items may be replaced
by a DDS-4 component.
Step 1. To remove the DDS-4 or DVD drive, push the front locking tab toward the DDS-4 or DVD drive,
then pull the tab out to slide the DDS-4 or DVD drive out of the chassis.
NOTE DDS-4 or DVD drive components include removable rails attached to both sides. If
the component is to be replaced, ensure that the replacement component includes the
plastic rails. If the rails are not included, extract the pin that holds each rail, remove
the rail, and install both rails on the replacement component.
There are two sets of holes on each side of the DDS-4 or DVD drive component.
Ensure that the rails are mounted so that the pins fit into the bottom set of holes.
One of the rails has a locking tab attached. Ensure that the rail with the locking tab
is mounted on the left side of theDDS-4 or DVD drive component, as shown in
Figure 4-9, above.
Step 2. Disconnect the power and SCSI cables from the rear of the DDS-4 or DVD drive.
Step 3. Pull the DDS-4 or DVD drive from the chassis and set aside.
NOTE If the system has only one DDS-4 or DVD drive installed, a tray will be located beneath the
DDS-4 or DVD drive as shown in the preceding figure. Follow the same removal procedure to
extract the tray, pushing the bottom front locking tab toward the tray then pulling out on the
tab to remove it from the chassis.
“TO REMOVE
PUSH
THEN PULL OUT”