
User Service Guide, Fourth Edition - Server Expansion Unit


Chapter 5
Removal and Replacement
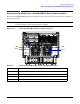
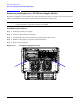
Removing and Replacing a Standby/Main Fan (Front)Assembly
56
Removing a Front Standby/Main Fan Assembly
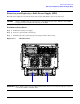
Step 1. Remove the bezel.
Step 2. Loosen the two blue-colored captive screws (lower left and upper right sides).
NOTE The blue captive screws are slotted so that a straight slot screwdriver can be used, if
necessary.
Step 3. Carefully pull on the fan to detach it from the nine-pin connector.
Step 4. Pull the fan away from the chassis.
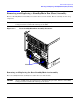
Replacing a Front Standby/Main Fan Assembly
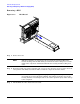
Step 1. Visually inspect the replacement part for proper number and revision.
Step 2. Position the fan assembly on the chassis fan guide pins.
Step 3. Carefully seat the fan into the nine-pin connector.
Step 4. Tighten the two blue-colored captive screws (lower left and upper right sides).
Step 5. Replace the bezel.
NOTE The fan LED will show that the fan is operational (green).