
User Service Guide, Fourth Edition - Server Expansion Unit


Chapter 5
Removal and Replacement
Removing and Replacing a PCI Card
66
Step 2. From the I/O Cards screen, select the card you will replace and then select the
Actions—>Replace
menu item.
Step 3. Wait for SAM to complete the critical resource analysis for the selected card and then review the
analysis results.
If no critical resources will be disabled by taking the selected card offline, click the
OK button to
suspend the card driver and power off the card PCI slot. Proceed with the next step.
If SAM detected that the selected PCI card cannot be taken offline, you will not be able to click the
OK button and cannot replace the card while HP-UX remains running. In this case, you must shut
down HP-UX on the nPartition before replacing the defective card.
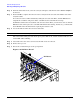
Step 4. Locate the PCI slot where the selected card resides.
NOTE On the SEU, you can see the PCI slots and slot LEDs from the rear of the cabinet.
The selected slot will be powered off (the green power LED is off), and the attention indicator (an
amber LED) will be blinking.
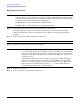
Step 5. Label and remove the cables connected to the PCI card to be removed.
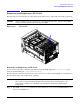
Step 6. Remove the top cover.
Step 7. Rotate the card slot PCI gate to the open position.
Figure 5-19 PCI Gate Detail
PCI Gates