
User Service Guide, Fourth Edition - Server Expansion Unit


Chapter 5
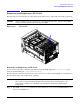
Removal and Replacement
Removing and Replacing a PCI Card
68
Replacing A PCI Card
NOTE The PCI I/O card installation process varies depending on which version of the HP-UX
operating system you are running on your system. PCI I/O card installation procedures should
be downloaded from the http://docs.hp.com/ Web site. Background information and procedures
for adding a new PCI I/O card using online addition are:
For HP-UX 11.11, consult the HP System Partitions Guide.
For HP-UX 11.23, consult the Interface Card OL* Support Guide.
Step 1. Visually inspect the replacement part for proper number and revision.
Consult the appropriate guide for instructions on preparing the operating system for online
addition of the PCI I/O card before attempting to insert a PCI I/O card into the PCI-X chassis
backplane.
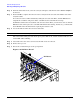
Step 2. Position and seat the replacement PCI card in the slot.
NOTE A slow, firm pressure is needed to properly seat the card into the connection.
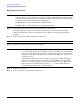
Step 3. Rotate the card slot PCI gate to the closed position.
NOTE The Server Expansion Unit implements manual retention latch (MRL) hardware for
use in online add or replacement (OLAR) operations. If an MRL is left open while the
server is booting, HP-UX can incorrectly cache PCI slot power status causing OLAR
operations to fail. To prevent this situation, ensure all the MRLs are closed before
booting the server.
If OLAR reports that a slot is present and powered off, but no OLAR operations to
turn power on to that slot have succeeded even after the MRL is closed, the MRL
may have been left open during boot. To clear this condition, close the MRL for the
PCI slot then power off the PCI slot using the rad -o command. This will allow
future OLAR operations to succeed on this PCI slot.
Step 4. Replace the top cover.
Step 5. Connect all cables to the replacement PCI card.