
User Service Guide, Fourth Edition - Server Expansion Unit


Chapter 5
Removal and Replacement
Installing and Removing the System Bus Adapter (SBA) Cable Assembly
70
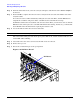
Step 4. Insert the four SBA cables, receptacle first, through the top and down the front of the System
backplane.
Step 5. Plug the two short cable receptacles into the backplane at the two plug-ins closest to the rear of the
SEU.
Step 6. Plug the two long cable receptacles into the backplane at the two plug-ins furthest from the rear of
the SEU. Tighten captive screws on the receptacles.
Step 7. Insert the cable bracket in the slot on the rear of the chassis.
Step 8. Attach the bridge bracket cover and tighten the two blue retainer screws.
Step 9. Install the SBA holder bracket on the System backplane.
Step 10. Install side and top covers.
Removing SBA Cables
Step 1. Remove left side cover.
Step 2. Remove top cover.
Step 3. Remove the SBA holder bracket on the System backplane.
Step 4. Loosen the two blue captive screws and remove the bridge bracket cover on the rear of the SEU,
upper left (from the front) corner.
Step 5. Loosen the captive screws on all four cable receptacles
Step 6. Loosen the four cable receptacles and carefully slide the cables, one at a time, up the System
backplane and lay them on the top of the SEU.
Step 7. Remove the cable bracket from the slot on the rear of the chassis.
Step 8. Lift the four SBA cables away from the top of the SEU.
Step 9. Install the top and side covers.